This is the first in a series of posts about writing a web application with the Play Framework in Scala. For the purpose of these posts, we will be writing an online concert ticket store named TicketOverlords. Some things will seem goofy or strange at first because not everything will be developed correctly the first time.
All of the code written during this tutorial is available as a git repository. You can follow the commit history as a separate learning path. The final commit for each post will be tagged as well. The final tag for this post is here.
Getting Started
The first thing we need to do is get the software for our development environment. I personally use the Scala IDE which is a version of Eclipse (I use the two names interchangeably). You can use what you want, that’s just what I use. In addition, you will need to get a copy of the Play Framework distributable that includes activator. (I’ve linked to the version I’m using, which may be outdated by the time you read this).
Creating a Basic Project
The activator tool comes with canned templates for the basic requirements and folder structure for a Play application. if you are not using activator but still want to follow along, the structure is documented here.
$ activator new

Fetching the latest list of templates...

Browse the list of templates: http://typesafe.com/activator/templates
Choose from these featured templates or enter a template name:
  1) minimal-akka-java-seed
  2) minimal-akka-scala-seed
  3) minimal-java
  4) minimal-scala
  5) play-java
  6) play-scala
(hit tab to see a list of all templates)
> 6
Enter a name for your application (just press enter for 'play-scala')
> ticket-overlords
At this point you will have a very basic project you can interact with by running the activator command line.
$ cd ticket-overlords
$ activator
... messages about loading the project ...
[ticket-overlords] $ ~ run
The run command starts the local web server on port 9000. You can verify it is
running a basic “Welcome to Play” page by opening up http://localhost:9000 with
any web browser. The ~ character before the run command causes the project
to recompile on any source code change. Otherwise, the source will recompile the
next time a request is made.
Getting the IDE up and Running
Preparing your project for eclipse is very straight forward inside activator:
[ticket-overlords] $ eclipse with-source=true
[info] About to create Eclipse project files for your project(s).
[info] Resolving jline#jline;2.11 ...
[info] Successfully created Eclipse project files for project(s):
[info] ticket-overlords
[ticket-overlords] $
Now in eclipse you can Import -> Existing Projects into Workspace. Sometimes when you do this, you may encounter an error with views not compiling. This is an oddity in eclipse but not when you compile inside activator.
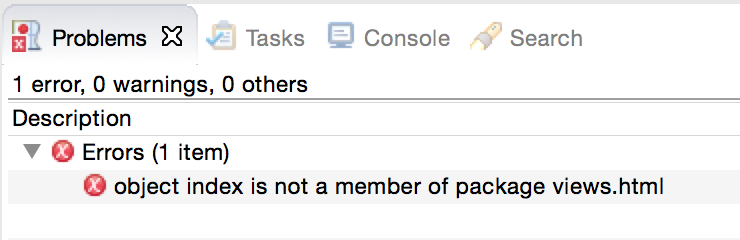
This is pretty common and nothing to be worried about. In the menu select
Project -> Properties then choose the Java Build Path option. Under the
source tab, click the Add Folder button and select the
target\scala-2.11\twirl\main folder and hit ok. After a refresh the compile
errors will disappear.
Since Play 2.4 was released since this post was published, the default template may not directly match the example here, so if you want a 2.3.8 version, check out the initial commit from the Project Repo
Exploring the Sample App
Make sure the activator console is running and load the application in your web browser. It should look similar to this:
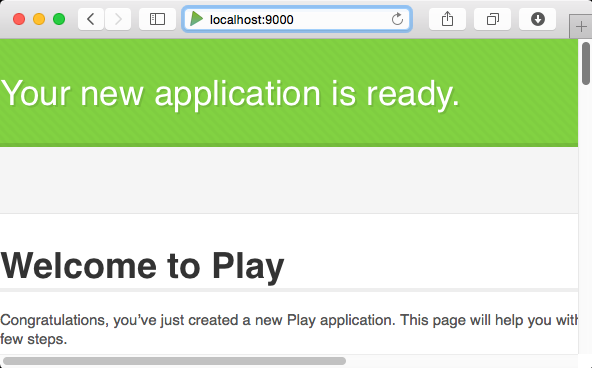
Open up app\controllers\Application.scala and you will see that it simply
loads views.html.index, which is the Play template file, by passing it to
Ok(). This is one of several Result classes that can be returned. The most
common ones to use are Ok and BadRequest. A view template is not the only
acceptable argument type for the Result input. You can pass in a String or a
JsValue among other things.
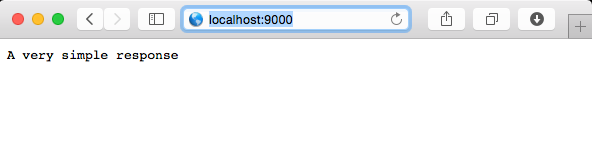
Replace the contents of the index function with a result that is just a raw string.
object Application extends Controller {
  def index = Action {
    //Ok(views.html.index("Your new application is ready."))
    Ok("A very simple response")
  }
}
When you reload this in your web browser, you will see the string output as the result.
Play templates
The Play framework includes a templating system named Twirl. The templates
reside in the app\views\ directory. If you open up index.scala.html you can
see the first line are the arguments passed in to the template. On the third
line there is a call to @main(). At first glance, the main template appears
to accept one argument, when in fact it is two. The block after
@main("Welcome to Play") is actually the second argument. If you open up
main.html.scala you can see it being passed in and then rendered inside the
body as @content.
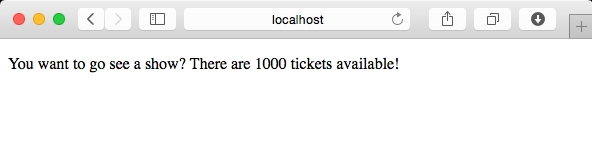
Let’s modify our index.html.scala to match the following code snippet:
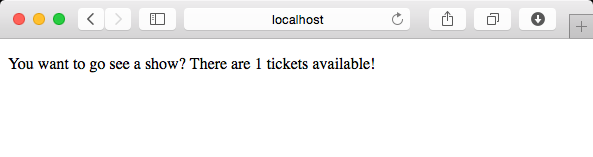
@(ticketsAvailable: Int)

@main("Ticket Overlords") {

<p>
    You want to go see a show? There are
    @{ticketsAvailable}
    tickets available!
</p>

}
Since we are now only expecting an Int to be passed in to the controller, we are now required to make the following change back in the Application controller:
def index = Action {
  val ticketsAvailable = 1000
  Ok(views.html.index(ticketsAvailable))
}
This looks ok for now, but there is a minor problem. The template as it stands
is hard coded to display the available quantity as plural. Change the
ticketsAvailable val in the index() function to be 1. And you will get the
following grammatically incorrect sentence.
Never fear! With twirl templates, you can simply embed scala inside of @{} and
have it render as you would expect:
<p>
    You want to go see a show? There
    @{if (ticketsAvailable != 1) "are" else "is"}
    @{ticketsAvailable}
    ticket@{if (ticketsAvailable!= 1) "s"} available!
</p>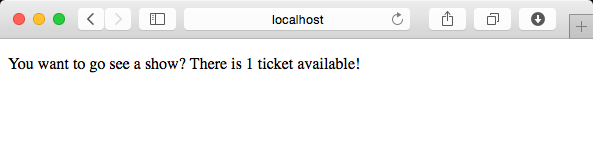
You can make the logic for your templates as complex as you want. Despite this capability, you should think hard about what logic belongs in the templates and what can be handled in the controller. Maintaining logic inside of a template is not fun for anyone and it is generally harder to test.
REST Services and Client Side Apps
So now you have learned the basics of using the template system and how they can be composed of other templates. If this was 2009, that would be wonderful. But it is not 2009, and all the rage these days are SPAs or other more complex applications primarily driven by client side rendering.
To do this, we are going to need a whole bunch of REST API endpoints and a single page that runs our AJAX (or AJAJ if you want to be pedantic) and builds the DOM from there.
Creating a controller and route
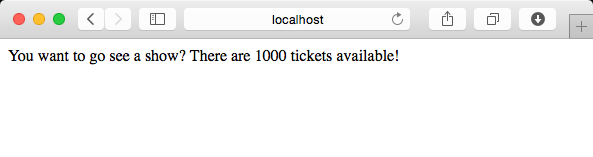
Up to this point, we have only been modifying the existing Application
controller that shipped with the canned layout. Create a new Scala Object
under the controllers package and name it Tickets and give it a superclass of
play.api.mvc.Controller. We are going to use this controller as the endpoint
to determine how many tickets are available, which for now is going to be our
constant value of 1000.
The controller objects are where we group common functions that will create our
web responses in the form of Actions. Go ahead and add a basic action named
ticketsAvailable that simply returns the value. When you’re done, your
controller should look similar to this:
package controllers

import play.api.mvc._

object Tickets extends Controller {
  def ticketsAvailable = Action { request =>
    val availableTickets = 1000
    Ok(availableTickets.toString)
  }
}
Notice the wildcard import for play.api.mvc._. That’s because I’m lazy. You
can go through and fix the specific imports after the fact, but for quick and
dirty development, it’s easier to just bring in the whole mvc namespace. There
is also a Request parameter passed in. Even if you are not using it directly,
it does not hurt to have it visibly present.
To expose this action for serving, we need to create a route. The routes for
Play applications are stored in the conf/routes file. Depending on the other
web frameworks you have used in the past you may notice that Play requires you
to explicity state the HTTP method for each route. This is because for a proper
REST service, a GET is different than a POST.
Open up the routes file and add the following line to the bottom of the file:
GET /tickets/available/ controllers.Tickets.ticketsAvailableFrom here we can use curl to verify the application is serving requests via
our new route.
$ curl -w '\n' http://localhost:9000/tickets/available/
1000
We now have a REST endpoint to tell us how many tickets are available for purchase. Unfortunately, this is a pretty lame response. There is no mechanism for the server to communicate errors and the X in AJAX stands for JSON! (Ok, it doesn’t but XML is gross.)
We can easily create a JSON response on the fly with the included Play json library. For our JSON payload we will have two fields:
result- Expected to contain “ok” on success or “ko” on failure
ticketQuantity- An integer value representing the number of available tickets on success or null on failure.
package controllers

import play.api.mvc._
import play.api.libs.json.Json

object Tickets extends Controller {
  def ticketsAvailable = Action { request =>
    val availableTickets = 1000
    val result = Json.obj(
      "result" -> "ok",
      "ticketQuantity" -> availableTickets)
    Ok(result)
  }
}
You can see the result with curl to verify the controller is serving the result as expected.
$ curl -w '\n' http://localhost:9000/tickets/available/
{"result":"ok","ticketQuantity":1000}
We can even run curl displaying the HTTP response headers and see that Play was
smart enough to detect the JSON and change the Content-Type of the HTTP
response to application/json
$ curl -w '\n' -i http://localhost:9000/tickets/available/
HTTP/1.1 200 OK
Content-Type: application/json; charset=utf-8
Content-Length: 37
{"result":"ok","ticketQuantity":1000}
Our ticketsAvailable function now works as expected, but there is definitely a
cleaner way to create response results. We can create case classes for the
responses. Note the use of the Option for the nullable field.
case class AvailabilityResponse(result: String, ticketQuantity: Option[Long])To prepare the case class for serialization, we need to create an implicit JSON formatter. A JSON formatter is the code that tells Play how the class is to be converted to JSON. This can be placed anywhere, but it is generally a good practice to place it inside the case class’s companion object.
object AvailabilityResponse {
  implicit val responseFormat = Json.format[AvailabilityResponse]
}
JSON formatters consist of a read converter (Json.reads) and a write converter
(Json.writes). Since ours is a straight forward case class, we can use the
convenient Json.format instead of creating a reads and writes separately.
More complex reads and writes can be built incrementally, but we do not need to
worry about that just yet.
We can now rewrite the ticketsAvailable function to utilize our new response
case class.
def ticketsAvailable = Action { request =>
  val availableTickets = 1000
  val response = AvailabilityResponse("ok", Option(availableTickets))
  Ok(Json.toJson(response))
}
With this, we can verify the result is identical to before:
$ curl -w '\n' http://localhost:9000/tickets/available/
{"result":"ok","ticketQuantity":1000}
Connecting the front end to the back end
Now that we have the back end working, we need to write a basic front end that
will connect to our API and display the results on the page dynamically.
Before we hook everything up, we are going to lay out the javascript code that
we want to run with TODOs as placeholders for the code we have not yet built.
Replace your index.html.scala view with the following.
@()

@main("Ticket Overlord") {
    <script type="text/javascript">
        // TODO: connect to ticketsAvailable endpoint
        callTicketsAvailableAsync()
            .onSuccess(function(result) {
                var qty = result.ticketQuantity;

                // Set the pluralization of the result
                var areVsIs = 'are ';
                var plural = 's';
                if (qty === 1) {
                    areVsIs = 'is ';
                    plural = '';
                }

                // Build the result string
                var display = 'There ' + areVsIs +
                    qty + ' ticket' +
                    plural + ' available!';
                // TODO: Write display var to ticketsAvailable span
            }).onFailure(function(err) {
                var errorText = 'There was an error';
                // TODO: Write errorText to ticketsAvailable span
            });
    </script>

    You want to go see a show?
    <span id="ticketsAvailable"></span>

}
Notice that we have removed the arguments to the index template so you will need
to modify your index function in Application.scala to not pass in any
arguments as well.
Linking to Third Party JS Libraries
Sure, we can just use document.getElementById to access the DOM elements,
but chances are we would eventually want some javascript library such as jQuery.
We can easily link to the jQuery CDN or download a copy and include it in your
source, but there’s a better way.
This better way is WebJars. With WebJars, client side dependencies are managed with sbt, the same way as other java and scala dependencies.
Add the following to your build.sbt file in the libraryDependencies section:
"org.webjars" % "jquery" % "2.1.3"
To download a dependency, you will need to exit activator and restart it. Once you have done that, you will notice the dependency being automatically downloaded. One of the primary benefits with this approach is that your repository does not grow or change based on upgrades to a third party library that you aren’t really modifying. The act of updating to a newer version is reflected in the source control as simply a version change in your build file.
Add the following to main.scala.html:
<script type="text/javascript" src="@routes.Assets.at("lib/jquery/jquery.min.js")"></script>Adding a Javascript Router
When it comes time to access the API endpoint /tickets/available/ that we
created earlier, you could just build up the request with an opaque string
that mirrors the route, or you can take advantage of another facet of Play.
Play has a feature called the Javascript Router that makes your server side
functions available to your client side code. Instead of copying paths to your
client side javascript and maintaining it in several places, you can create an
object that contains all of this functionality for you. Open up
controllers.Application.scala and add the following function to the
controller:
def jsRoutes = Action { implicit request =>
  Ok(
    Routes.javascriptRouter("jsRoutes")(
      routes.javascript.Tickets.ticketsAvailable
    )
  )
}
Since the javascript router is another Action, we also need to create a route to make it accessible:
GET /jsr/ controllers.Application.jsRoutesFinally, add a link to the javascript generated for the router in
main.scala.html underneath the previous script tag from the jQuery WebJar:
<script type="text/javascript" src="@routes.Application.jsRoutes"></script>By adding it to main.scala.html this router object is available to any view
that inherits from main. Any function added to the javascript router is now
accessible in client side javascript with the pattern
jsRoutes.controllers.ControllerName.functionName(arguments, to, function).
The resulting object contains an .ajax() function built in, making a clean and
easy way to interact with your web services.
This can all be combined with the previous index.scala.html to create an ajax
powered page.
@()

@main("Ticket Overlord") {
    <script type="text/javascript">
        $(document).ready(function(){

        // connect to ticketsAvailable endpoint
        var ticketsAvail = jsRoutes.controllers.Tickets.ticketsAvailable();

        ticketsAvail.ajax({
            success: function(result) {
                var qty = result.ticketQuantity;

                // Set the pluralization of the result
                var areVsIs = 'are ';
                var plural = 's';
                if (qty === 1) {
                    areVsIs = 'is ';
                    plural = '';
                }

                var display = 'There ' + areVsIs +
                	qty + ' ticket' +
                    plural + ' available!';

                // Write display var to ticketsAvailable span
                $("#ticketsAvailable").text(display);
            },
            failure: function(err) {
                var errorText = 'There was an error';
                // Write errorText to ticketsAvailable span
                $("#ticketsAvailable").text(errorText);
            }
        });

        });
    </script>

    You want to go see a show?
    <span id="ticketsAvailable"></span>

}
Refresh the page again in your browser and you’ll see the result that looks identical to the template one, but has now been rendered using the asynchronous call to the API.
Until next time…
At this point we have built a controller, created JSON serialized case classes, added a third party WebJar and used a javascript router to enable our AJAX calls.
This is a good first step towards our Ticket Overlords store, but it is just scratching the surface. In Part 2, we will upgrade from framework version 2.3 to the soon to be released Play framework 2.4. In Part 3, we will cover database access, schema creation and migration and build out more of the REST API.