In Part 1 we covered routes, controllers and client side scripting which led to a very basic and not very useful result. In this post we will walk through what is required to read, write and maintain a database for Ticket Overlords. The technologies we will be using are Slick 3.0 and Evolutions.
As before, the source code for this tutorial series is available on github with the code specifically for this post here. Since the code builds on the previous post, you can grab the current state of the project (where part two finished) here.
The initial data model
Before we dive into the database code, we need to sketch out the classes we intend to persist into the database. For this basic example, we are going to create two classes:
- Event
- The concert, festival, monster truck rally, etc
- TicketBlock
- Each event could have different groupings of tickets with different pricing. We are going to ignore seat plans for now. Everything is general admission, but there could be VIP packages or early bird pricing.
For these two classes, we can sketch out a basic class model that looks like this:
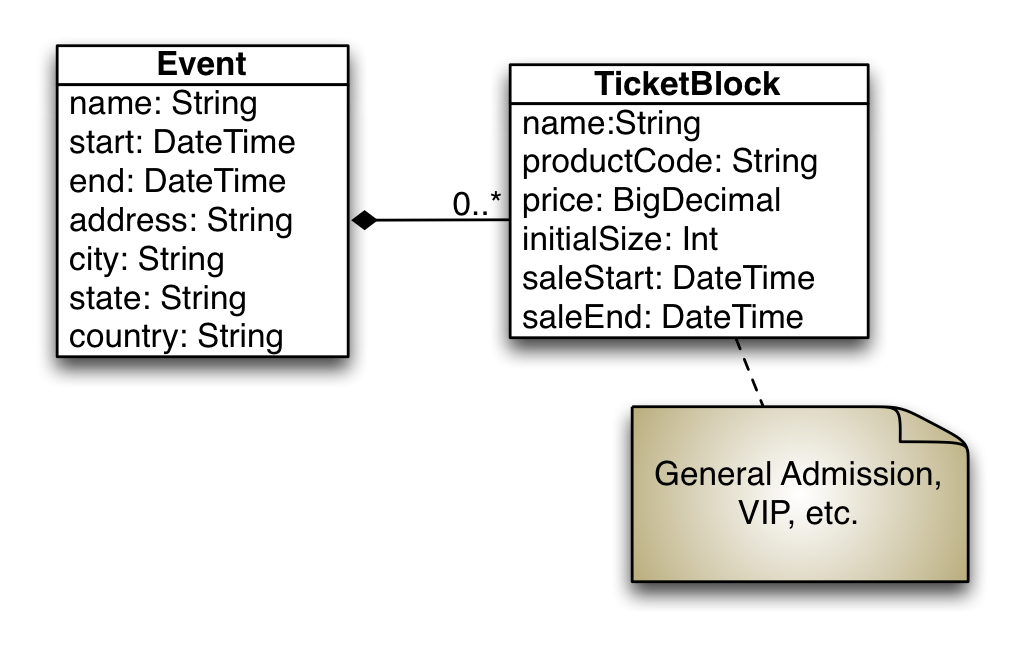
We are taking a simplistic approach to the data model, the event would realistically link to a venue that has all the correct address and geo information. For now, this should be adequate.
We can easily transfer these models to case classes. Start by creating a new
package namespace com.semisafe.ticketoverlords in the app directory. This is
different than our current layout of controllers and views being packages.
The default Play convention differs from the traditional style guide.
I personally leave the controllers where they are and use Java naming
conventions for everything else. You will find what works best in your
organization.
In the new ticketoverlords package create a Scala Class named Event.scala.
package com.semisafe.ticketoverlords

import org.joda.time.DateTime

case class Event(
  name: String,
  start: DateTime,
  end: DateTime,
  address: String,
  city: String,
  state: String,
  country: String)
And create a second class named TicketBlock.scala.
package com.semisafe.ticketoverlords

import org.joda.time.DateTime

case class TicketBlock(
  name: String,
  productCode: String,
  price: BigDecimal,
  initialSize: Int,
  saleStart: DateTime,
  saleEnd: DateTime)
That looks like what we modeled earlier, but there are a couple practical
problems. The first problem is that we do not have anything that resembles a
natural key for when we store these to a database or reference them via an API
request. We also need a relation to connect a TicketBlock to an Event. Since
this is a many-to-one relationship from TicketBlock to Event we will just
add the Event’s id field to the TicketBlock as well.
The updated Event class definition should now look like this:
case class Event(
  id: Long,
  name: String,
  start: DateTime,
  end: DateTime,
  address: String,
  city: String,
  state: String,
  country: String)
And the updated TicketBlock class definition should look like this:
case class TicketBlock(
  id: Long,
  eventID: Long,
  name: String,
  productCode: String,
  price: BigDecimal,
  initialSize: Int,
  saleStart: DateTime,
  saleEnd: DateTime)
REST endpoints for the models
Now that we have the model classes defined we can start to build an API to interact with what will become our data access layer. We will code the API first as we have done similar API work in the previous post. We can then use the new API to verify the data layer is working as expected.
For our API we are just going to support creating and reading. The operations we will want for each class are:
- Create an Event or TicketBlock
- Retrieve an Event or TicketBlock by id
- Retrieve all Events or TicketBlocks
We can get started by creating the Events controller. In this controller we
are using more than the Ok and BadRequest results we have used previously.
Play includes response types for any of the HTTP response formats you would
like to return.
Also worth mentioning is the data type of events being a Seq. I personally
default to List as my go-to collection type, which is not a good idea. When
possible, you should generalize your data types. In this case the function does
not care one bit if the resulting collection is a List or a Vector or
something else entirely.
package controllers

import play.api.mvc._
import play.api.libs.json.Json

import com.semisafe.ticketoverlords.Event

object Events extends Controller {
  def list = Action { request =>
    val events: Seq[Event] = ???
    Ok(Json.toJson(events))
  }

  def getByID(eventID: Long) = Action { request =>
    val event: Option[Event] = ???
    event.fold {
      NotFound(Json.toJson("No event found"))
    } { e =>
      Ok(Json.toJson(e))
    }
  }

  def create = Action { request =>
    // parse from json post body
    val incomingEvent: Event = ???

    // save event and get a copy back
    val createdEvent: Event = ???

    Created(Json.toJson(createdEvent))
  }
}
You will have noticed an error that states
No Json serializer found for type Seq[com.semisafe.ticketoverlords.Event] was
output by the IDE. As we did in the previous post, we solve this by adding a
formatter to Event’s companion object.
package com.semisafe.ticketoverlords

import play.api.libs.json.{Json, Format}

// ... <Other imports>

// ... <case class definition>

object Event {
  implicit val format: Format[Event] = Json.format[Event]
}
Normalized Responses
If you recall from part 1, there was a JSON envelope we used to wrap the
result that was named AvailabilityResponse. We will create a generic version
of that now in the controllers.responses package named EndpointResponse.
package controllers.responses

case class ErrorResult(status: Int, message: String)

case class EndpointResponse(
  result: String,
  response: Option[Any],
  error: Option[ErrorResult])
Since these are intended to be converted to JSON as the response is sent, this would be a good time to add the companion object with the JSON formatter.
package controllers.responses

import play.api.libs.json.{ Json, Format }

case class ErrorResult(status: Int, message: String)
object ErrorResult {
  implicit val format: Format[ErrorResult] = Json.format[ErrorResult]
}

case class EndpointResponse(
  result: String,
  response: Option[Any],
  error: Option[ErrorResult])

object EndpointResponse {
  implicit val format: Format[EndpointResponse] = Json.format[EndpointResponse]
}
Unfortunately, now eclipse is telling us there is a problem with our response
classes. There is no implicit format for the Any type, which makes sense since
it can be literally anything.
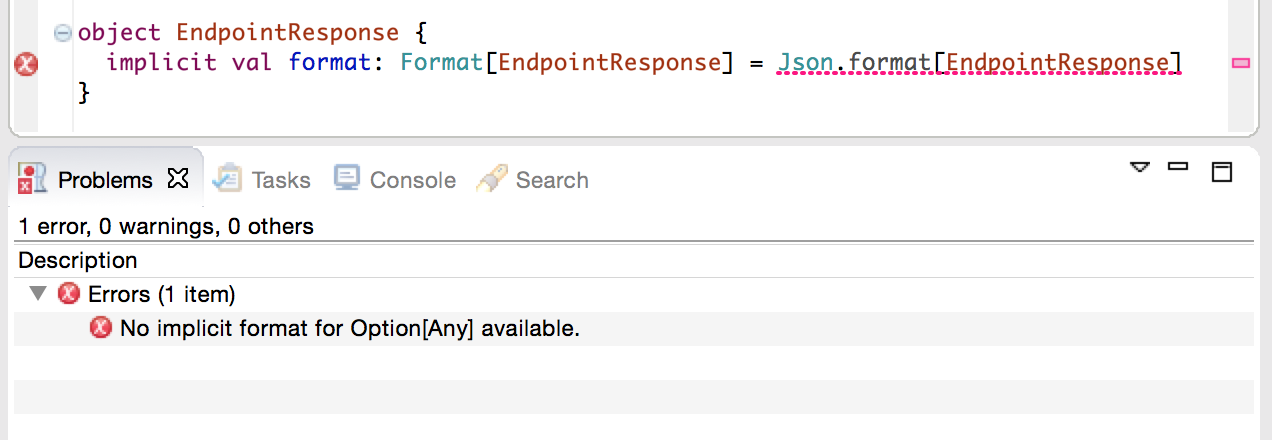
Here we can take advantage of the fact that a member value that is already a
JsValue will stay a JsValue when converted to JSON.
// ... <snip> ...

import play.api.libs.json.{ Json, Format, JsValue }

// ... <snip> ...

case class EndpointResponse(
  result: String,
  response: JsValue,
  error: Option[ErrorResult]) {
}

object EndpointResponse {
  implicit val format: Format[EndpointResponse] = Json.format[EndpointResponse]
}
We do not need to make response an Option since JsValue has a JsNull
value that can be used in the place of None. It is a little ugly that the
case class accepts both a response and an error at the same time. We can
mitigate this somewhat by creating two objects with apply methods that return
an EndpointResponse. Our SuccessResponse will always have a result of ok
while our ErrorResponse will always have a result of ko.
// ... <snip> ...

import play.api.libs.json.{ Json, Format, JsValue, JsNull }

// ... <snip> ...

object ErrorResponse {
  def apply(status: Int, message: String) = {
    EndpointResponse("ko", JsNull, Option(ErrorResult(status, message)))
  }
}

object SuccessResponse {
  def apply(successResponse: JsValue) = {
    EndpointResponse("ok", successResponse, None)
  }
}
We can now instantiate our EndpointResponse without needing to worry about
the result value not matching or the wrong response portion being populated.
Another improvement we can make here is on our SuccessResponse object. The
requirement of passing a JsValue adds extra code on the calling side.
This can be improved by adding a type parameter to SuccessResponse’s
apply function and an implicit writes value to be used in the apply
function.
// ... <snip> ...

import play.api.libs.json.{ Json, Format, JsValue, JsNull, Writes }

// ... <snip> ...

object SuccessResponse {
  def apply[A](successResponse: A)(implicit w: Writes[A]) = {
    EndpointResponse("ok", Json.toJson(successResponse), None)
  }
}
This will automatically pick up on the Json writes when apply is called based
on the current implicit scope. We can add this to our Events controller to
unify the action responses.
package controllers

import play.api.mvc._
import play.api.libs.json.Json

import com.semisafe.ticketoverlords.Event
import controllers.responses._

object Events extends Controller {
  def list = Action { request =>
    val events: Seq[Event] = ???
    Ok(Json.toJson(SuccessResponse(events)))
  }

  def getByID(eventID: Long) = Action { request =>
    val event: Option[Event] = ???
    event.fold {
      NotFound(Json.toJson(ErrorResponse(NOT_FOUND, "No event found")))
    } { e =>
      Ok(Json.toJson(SuccessResponse(e)))
    }
  }

  def create = Action { request =>
    // parse from json post body
    val incomingEvent: Event = ???

    // save event and get a copy back
    val createdEvent: Event = ???

    Created(Json.toJson(SuccessResponse(createdEvent)))
  }
}
Reading incoming data
With the controller capable of output, we can turn our attention to the create
action. The first line expects there to be a JSON body for the POST request that
matches up with our Event class. To accomplish this, we change the Action to
an Action(parse.json) which tells Play we are expecting a JSON body with a
matching Content-Type. Once we enter the function, the value request.body
has been transformed into a JsValue. The JsValue type has a validate
method that returns a JsResult value, which can then be folded to safely
access the actual data. Note the INVALID_JSON constant is just an arbitrary
value (of 1000) added to the ErrorResponse object.
def create = Action(parse.json) { request =>
  val incomingBody = request.body.validate[Event]

  incomingBody.fold(error => {
    val errorMessage = s"Invalid JSON: ${error}"
    val response = ErrorResponse(ErrorResponse.INVALID_JSON, errorMessage)
    BadRequest(Json.toJson(response))
  }, { event =>
    // save event and get a copy back
    val createdEvent: Event = ???

    Created(Json.toJson(SuccessResponse(createdEvent)))
  })
}
One more thing to fix is that when we call list or getByID, the return
values will have a valid id, as they already exist in our system. When calling
the create action, the data being passed in via JSON will have no idea what
the expected id value should be. If we change the case classes to have an
Option for the id fields, both outgoing and incoming cases can be safely
handled.
case class Event(
  id: Option[Long],
  name: String,
  start: DateTime,
  end: DateTime,
  address: String,
  city: String,
  state: String,
  country: String)
case class TicketBlock(
id: Option[Long],
eventID: Long,
name: String,
productCode: String,
price: BigDecimal,
initialSize: Int,
saleStart: DateTime,
saleEnd: DateTime)Once more with the TicketBlocks
This has everything we need, except for the data access logic. We can write a
TicketBlocks controller that contains identical functionality.
package controllers

import play.api.mvc._
import play.api.libs.json.Json

import com.semisafe.ticketoverlords.TicketBlock
import controllers.responses._

object TicketBlocks extends Controller {
    def list = Action { request =>
    val ticketBlocks: Seq[TicketBlock] = ???
    Ok(Json.toJson(SuccessResponse(ticketBlocks)))
  }

  def getByID(ticketBlockID: Long) = Action { request =>
    val ticketBlock: Option[TicketBlock] = ???

    ticketBlock.fold {
      NotFound(Json.toJson(ErrorResponse(NOT_FOUND, "No ticket block found")))
    } { tb =>
      Ok(Json.toJson(SuccessResponse(tb)))
    }
  }

  def create = Action(parse.json) { request =>
    val incomingBody = request.body.validate[TicketBlock]

    incomingBody.fold(error => {
      val errorMessage = s"Invalid JSON: ${error}"
      val response = ErrorResponse(ErrorResponse.INVALID_JSON, errorMessage)
      BadRequest(Json.toJson(response))
    }, { ticketBlock =>
      // save ticket block and get a copy back
      val createdBlock: TicketBlock = ???

      Created(Json.toJson(SuccessResponse(createdBlock)))
    })
  }
}
You will also need to create the JSON formatter in the TicketBlock companion
object.
// ... <snip> ...

import play.api.libs.json.{ Json, Format }

// ... <snip> ...

object TicketBlock {
  implicit val format: Format[TicketBlock] = Json.format[TicketBlock]
}
Routing
The only thing left on our API side is to add the actions to the routes file.
Open up conf\routes and add the POST route for the create action, and the
two GET routes for the list and getByID actions.
# Event Resource
POST    /events/                    controllers.Events.create
GET     /events/                    controllers.Events.list
GET     /events/:eventID/           controllers.Events.getByID(eventID: Long)

# Ticket Block Resource
POST    /tickets/blocks/            controllers.TicketBlocks.create
GET     /tickets/blocks/            controllers.TicketBlocks.list
GET     /tickets/blocks/:blockID/   controllers.TicketBlocks.getByID(blockID: Long)
This is the first time we have required a parameter to be extracted from the URL path. As can be seen, arguments are prepended with a colon and can be validated to match the expected data type when the request is made.
Defining a schema with Evolutions
Now that the API is defined, we are ready to create the database. For schema
management, Play supports a component called evolutions which used to be
enabled by default. As of 2.4, you must explicitly add a dependency for
evolutions. To include the evolutions library, you would normally add the
following to your build.sbt file.
libraryDependencies += evolutionsNote that I used the word “normally”. We are going to be using Slick to
access the database, which changes some things. To add support for evolutions,
update your build.sbt file to match these dependencies:
libraryDependencies ++= Seq(
  specs2 % Test,
  cache,
  ws,
  "org.webjars" % "jquery" % "2.1.3",
  "com.typesafe.play" %% "play-slick-evolutions" % "1.0.0"
)
The dependency for slick itself is implicit in the requirement for
“play-slick-evolutions”. We will directly add that requirement later. It is
worth noting that slick conflicts with the “jdbc” dependency. If you have
“jdbc” present, you will need to remove it. Since we must now explicitly add
evolutions, there is some incorrect information in our application.conf (if
you started with a 2.3.x version like our repo). Go ahead and clear the lines
about evolutions from your configuration if they are present.
Creating the schema
To have evolutions create your tables, you need to create a SQL script defining
the schema structure. Start by creating the directory conf/evolutions/default
and then create a file named 1.sql in that directory. The default directory
is named after the default database in the configuration file. If you are
connecting to multiple databases, each database can have it’s own set of
evolutions.
Inside of 1.sql you will have two sections, the Ups and the Downs which
are used to upgrade and downgrade a schema respectively. Add the following SQL
to create our Event and TicketBlock tables.
# --- !Ups

CREATE TABLE events (
    id INTEGER AUTO_INCREMENT PRIMARY KEY,
    name VARCHAR,
    start DATETIME,
    end DATETIME,
    address VARCHAR,
    city VARCHAR,
    state VARCHAR,
    country CHAR(2)
);

CREATE TABLE ticket_blocks (
    id INTEGER AUTO_INCREMENT PRIMARY KEY,
    event_id INTEGER,
    name VARCHAR,
    product_code VARCHAR(40),
    price DECIMAL,
    initial_size INTEGER,
    sale_start DATETIME,
    sale_end DATETIME,
    FOREIGN KEY (event_id) REFERENCES events(id)
);

# --- !Downs

DROP TABLE IF EXISTS ticket_blocks;
DROP TABLE IF EXISTS events;
Since this is just raw SQL you can take advantage of any vendor specific features and datatypes for the database you are using. For this example, we are going to use the H2 database engine with MySQL compatibility turned on. Add the H2 database library as a dependency now. The version listed is just the most recent version at the time of writing.
libraryDependencies ++= Seq(
  specs2 % Test,
  cache,
  ws,
  "org.webjars" % "jquery" % "2.1.3",
  "com.typesafe.play" %% "play-slick-evolutions" % "1.0.0",
  "com.h2database" % "h2" % "1.4.187"
)
Now that we have included the H2 database in our project, we need to define the
configuration for connecting to it. Open up the conf/application.conf file to
the Database configuration section. You may notice something similar to this:
# Database configuration
# ~~~~~
# You can declare as many datasources as you want.
# By convention, the default datasource is named `default`
#
# db.default.driver=org.h2.Driver
# db.default.url="jdbc:h2:mem:play"
# db.default.user=sa
# db.default.password=""
Go ahead and delete that. As we will be using Slick, the database configuration is slightly different.
slick.dbs.default.driver="slick.driver.H2Driver$"
slick.dbs.default.db.driver="org.h2.Driver"
slick.dbs.default.db.url="jdbc:h2:./db/overlord;MODE=MYSQL"
slick.dbs.default.db.user=sa
slick.dbs.default.db.password=""
The url differs a bit from the commented example. Instead of using H2 as an in-memory database, we will be writing to the filesystem. This will make it easier to inspect data between multiple development sessions. In production, we would want to change this to something like MySQL or Postgres but for sample development H2 works fine for persistence.
Applying an evolution
If the application is not currently running inside of activator, start it now
and point your browser to http://localhost:9000/. You will see a message
presented by evolutions stating that the database schema is out of sync and
needs to updated.
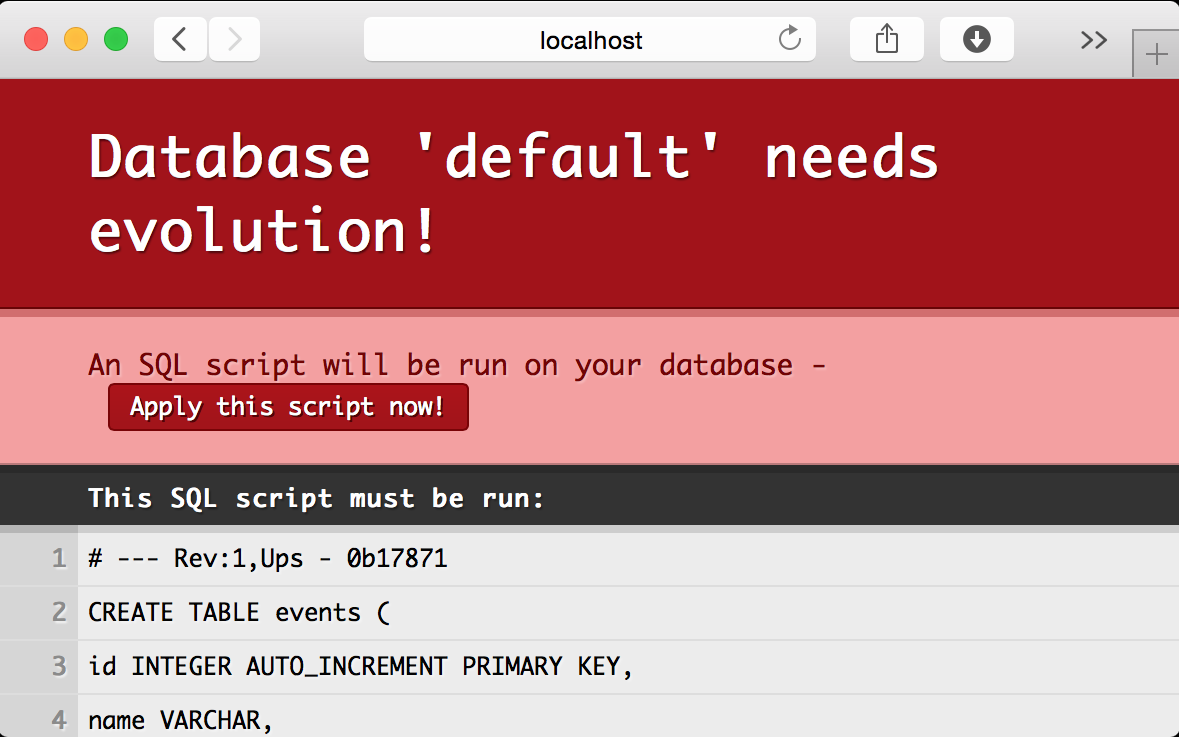
After you hit the Apply button, you may notice there are new files in your
project under the db directory. This is your newly created H2 database. In
your activator console load the h2-browser.
[ticket-overlords] $ h2-browserThis will open up your browser with a populated form pointing to the location
of your H2 database. (If your form is not populated, just point it to the
filesystem path of your project with /db/overlord appended)
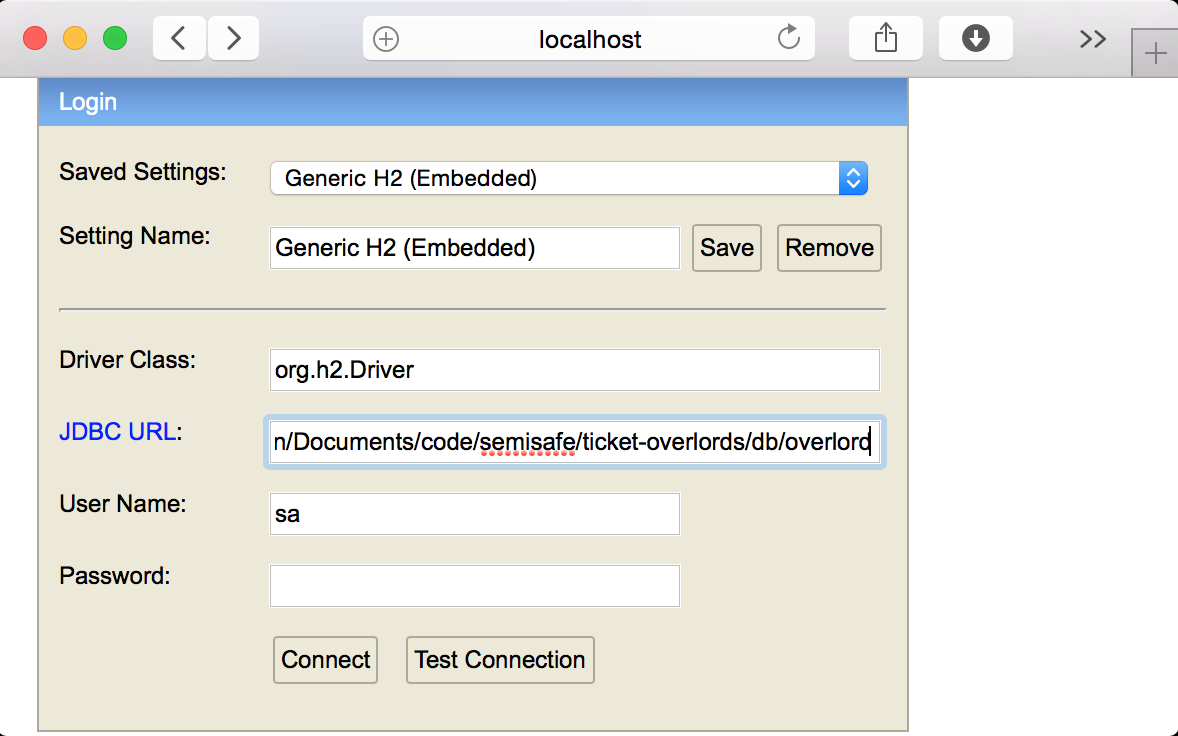
After you connect, you will get an interactive database web application that allows you to explore the schema and perform manual queries. This is useful for prototyping your SQL queries and debugging general data issues.
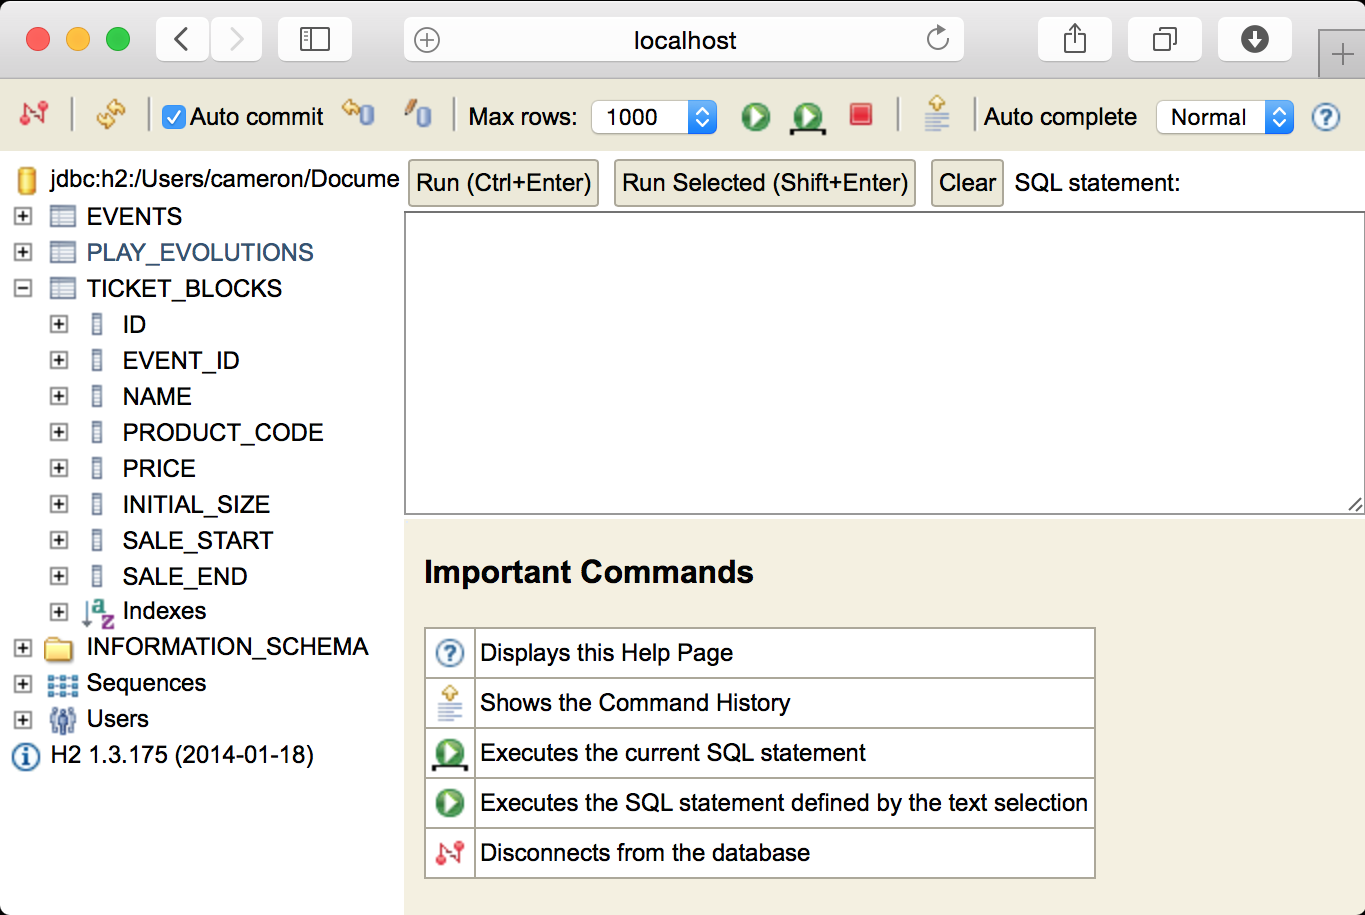
We will use the interactive browser to insert our first event.
INSERT INTO events
    (name, start, end, address, city, state, country)
VALUES
    ('Kojella', '2014-04-17 8:00:00-07:00', '2014-04-19 23:00:00-07:00',
     '123 Paper St.', 'Palm Desert', 'CA', 'US');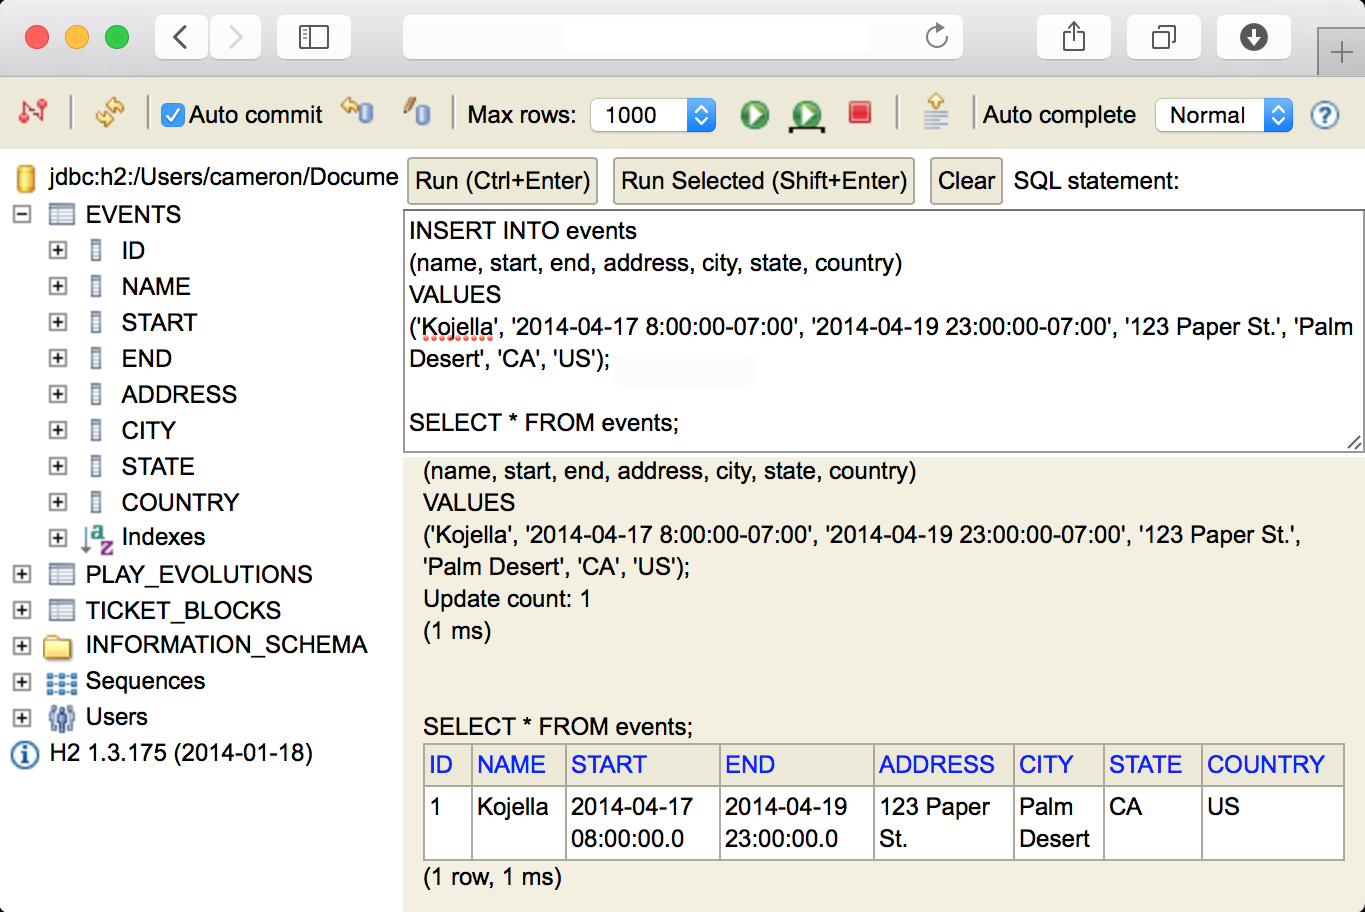
Data access with slick
We have the database defined, the classes modeled and the API to pass the data over HTTP. To interact with the database, we are going to be using Slick. Slick is just one of a few different data access libraries available for Scala.
To add Slick support to our project, we need to add the “play-slick” library to
our build.sbt libraryDependencies sequence. It was already included earlier
when we added our evolutions dependency, but it is worth explicitly adding it
now.
libraryDependencies ++= Seq(
  specs2 % Test,
  cache,
  ws,
  "org.webjars" % "jquery" % "2.1.3",
  "com.typesafe.play" %% "play-slick-evolutions" % "1.0.0",
  "com.h2database" % "h2" % "1.4.187",
  "com.typesafe.play" %% "play-slick" % "1.0.0"
)
Creating a DAO
We are going to write our data access functions as members of the model class’s
companion object. Some people prefer to put all database related code in a
separate data access object. In a later post we will illustrate why that can be
beneficial. Given the code for the controllers, we know we need list,
getByID and create methods, so we will start by adding those now.
object Event {
  implicit val format: Format[Event] = Json.format[Event]

  def list: Seq[Event] = { ??? }

  def getByID(eventID: Long): Option[Event] = { ??? }

  def create(event: Event): Event = { ??? }
}
These signatures look similar to how our controller started out, which makes sense, as our controllers do not really perform much in the way of logic.
Creating a table definition
Inside of our Event object, we will now create a Table Definition. This
maps our existing table structure to the schema that we created earlier, pairing
it with the Event case class we have already created.
// ... <snip> ...

import play.api.db.slick.DatabaseConfigProvider
import slick.driver.JdbcProfile
import play.api.Play.current
import play.api.db.DBApi

// ... <snip> ...

object Event {
  implicit val format: Format[Event] = Json.format[Event]

  protected val dbConfig = DatabaseConfigProvider.get[JdbcProfile](current)
  import dbConfig._
  import dbConfig.driver.api._

  class EventsTable(tag: Tag) extends Table[Event](tag, "EVENTS") {

    def id = column[Long]("ID", O.PrimaryKey, O.AutoInc)
    def name = column[String]("NAME")
    def start = column[DateTime]("START")
    def end = column[DateTime]("END")
    def address = column[String]("ADDRESS")
    def city = column[String]("CITY")
    def state = column[String]("STATE")
    def country = column[String]("COUNTRY")

    def * = ???
  }

  val table = TableQuery[EventsTable]

  def list: Seq[Event] = { ??? }

  def getByID(eventID: Long): Option[Event] = { ??? }

  def create(event: Event): Event = { ??? }
}
For this table, we have created the column definitions by defining the native scala data type for each column, and indicating the primary key for the ID column. Note that since we are using H2, we are required to have the SQL column names in upper case. Your queries will not function correctly if they are lower case.
In addition, we created a val named table that represents a TableQuery for
our defined events table. This will save us some typing in the future.
You will also notice that this code does not actually compile. The reason is
that we are using org.joda.time.DateTime for our dates. Slick does not
natively support DateTime but does natively support java.sql.Timestamp. We
can solve this by creating an implicit mapping function. Create a new object
named SlickMapping in the com.semisafe.ticketoverlords package.
package com.semisafe.ticketoverlords

import org.joda.time.DateTime
import java.sql.Timestamp
import play.api.db.slick.DatabaseConfigProvider
import slick.driver.JdbcProfile
import play.api.Play.current

object SlickMapping {
  protected val dbConfig = DatabaseConfigProvider.get[JdbcProfile](current)
  import dbConfig._
  import dbConfig.driver.api._

  implicit val jodaDateTimeMapping = {
    MappedColumnType.base[DateTime, Timestamp](
      dt => new Timestamp(dt.getMillis),
      ts => new DateTime(ts))
  }
}
With this code, we can now import SlickMapping.jodaDateTimeMapping in any
file we are using a DateTime type within a Slick table definition. Our
SlickMapping function will work fine for our purposes, but for extensive joda
Date and Time usage there is the slick-joda-mapper library by tototoshi.
The next portion to fill out is the definition of * with respect to querying
our table. This is defined as a tuple of the columns we require to be returned
when we perform this query. It does not have to match the database directly,
just what we actually want to retrieve from the database. (This is useful if
there are large fields or deprecated columns that we do not want our code to
be concerned with).
def * = (id.?, name, start, end, address, city, state, country) <>
     ((Event.apply _).tupled, Event.unapply)
Since our Event class expects id to be an Option, we append the ?
modifier to the column, indicating to Slick that this is the case. The <>
function gives us a MappedShape which allows us to transform this tuple
directly into the Event case class that we intend to work with in general.
Retrieving all records
From here we can start to fill out our three data access functions. The list
function is the most straight forward, as Slick supports the same function
directly on the TableQuery result.
def list: Seq[Event] = {
  val eventList = table.result
  db.run(eventList)
}
This does not actually work. We get a compile error that the expected type does not match the actual type.
type mismatch;

found:
scala.concurrent.Future[Seq[EventDAO.this.EventsTable#TableElementType]]
  (which expands to)
scala.concurrent.Future[Seq[com.semisafe.ticketoverlords.Event]]

required:
Seq[com.semisafe.ticketoverlords.Event]
This fails to compile since db.run() returns a Future instead of the
raw value. This is a new default behavior in Slick 3.0. If you are familiar with
other database access libraries (such as Anorm) you may be less accustomed with
this behavior. (Or you have been wrapping you queries in a Future anyways)
Slick performs database requests asynchronously, which allows your code not to
be blocked by time intensive database queries. It makes sense, since a database
operation takes more time than normal computation or it can fail and generally
ruin your day when you only assume the best will happen. Since we do not really
care about the contents of the result yet, we can simply pass the Future up
to the caller and consider this method done.
import scala.concurrent.Future

// ... <snip> ...

def list: Future[Seq[Event]] = {
  val eventList = table.result
  db.run(eventList)
}
Retrieving a subset of records
The getByID function is slightly more complex, as we are actually starting to
interact with the data. As before, our result will actually be a Future of the
desired result.
def getByID(eventID: Long): Future[Option[Event]] = {
  val eventByID = table.filter { f =>
    f.id === eventID
  }.result.headOption

  db.run(eventByID)
}
We start by filtering out data that does not match our predicate (that the
supplied eventID matches the row’s ID). After we are done applying our
transformation we call the headOption method to execute the query while only
returning the first result, if there is any result at all.
Adding new records
To add a record to our database, the syntax changes somewhat. We treat the table definition as a collection, with a modifier indicating the value we want returned after the record is inserted.
def create(newEvent: Event): Future[Event] = {
  val insertion = (table returning table.map(_.id)) += newEvent

  val insertedIDFuture = db.run(insertion)

  val createdCopy: Future[Event] = ???

  createdCopy
}
After we successfully insert the record, we have a Future[Long]. That is fine
for the other functions, but we need the actual value to copy the original case
class with the updated ID field. When faced with a Future[] containing a value
you need direct access to you generally have two options:
- Use
Await.result()to block until theFuturecompletes - Not ever do that. Not ever. No.
The answer is always #2. (except maybe in unit tests)
We can utilize map on the future to transform it from a Future[Long] to
create a new Future[Event]. As you are typing this, the compiler may warn that
you need an implicit execution context and recommend importing the generic one
(scala.concurrent.ExecutionContext.Implicits.global). That will work, but the
correct context to use is the one provided by Play.
import play.api.libs.concurrent.Execution.Implicits._

// ... <snip> ...

def create(newEvent: Event): Future[Event] = {
  val insertion = (table returning table.map(_.id)) += newEvent

  val insertedIDFuture = db.run(insertion)

  val createdCopy: Future[Event] = insertedIDFuture.map { resultID =>
    newEvent.copy(id = Option(resultID))
  }

  createdCopy
}
Tying it all together
We should now have everything required to read events from the database. We need
to update the Events controller to utilize our new data access methods,
starting with the list method.
import scala.concurrent.Future
import play.api.libs.concurrent.Execution.Implicits._

// ... <snip> ...

def list = Action { request =>
  val eventFuture: Future[Seq[Event]] = Event.list

  val response = eventFuture.map { events =>
    Ok(Json.toJson(SuccessResponse(events)))
  }

  response
}
Once again we map the future, giving us the ability to transform one future into another. Unfortunately, this does not compile either.
We are not able to return the future directly as our action is defined, but this
case happens so frequently that switching the Action to expect a
Future[Result] is as simple as changing the method definition from
Action to Action.async.
def list = Action.async { request =>
  val eventFuture: Future[Seq[Event]] = Event.list

  val response = eventFuture.map { events =>
    Ok(Json.toJson(SuccessResponse(events)))
  }

  response
}
We can do this for the other two remaining methods in the controller and end up with an object like this:
object Events extends Controller {
  def list = Action.async { request =>
    val eventFuture: Future[Seq[Event]] = Event.list

    val response = eventFuture.map { events =>
      Ok(Json.toJson(SuccessResponse(events)))
    }

    response
  }

  def getByID(eventID: Long) = Action.async { request =>
    val eventFuture: Future[Option[Event]] = Event.getByID(eventID)

    eventFuture.map { event =>
      event.fold {
        NotFound(Json.toJson(ErrorResponse(NOT_FOUND, "No event found")))
      } { e =>
        Ok(Json.toJson(SuccessResponse(e)))
      }
    }
  }

  def create = Action.async(parse.json) { request =>
    val incomingBody = request.body.validate[Event]

    incomingBody.fold(error => {
      val errorMessage = s"Invalid JSON: ${error}"
      val response = ErrorResponse(ErrorResponse.INVALID_JSON, errorMessage)
      Future.successful(BadRequest(Json.toJson(response)))
    }, { event =>
      // save event and get a copy back
      val createdEventFuture: Future[Event] = Event.create(event)

      createdEventFuture.map { createdEvent =>
        Created(Json.toJson(SuccessResponse(createdEvent)))
      }

    })
  }
}
Notice that the create method can have a custom body handler as well as being
async. As well, since the create method has an alternate return path with a
BadRequest response, that result needs to be wrapped in a
Future.successful() method.
Verification
We can use curl to verify that our endpoint works as expected. Notice the date
is in milliseconds since the epoch. This makes it easiest to interact with
javascript on the client side. You can use the terminal’s date command to
convert it to a readable version if you shave off the milliseconds.
$ curl -w '\n' localhost:9000/events/

{"result":"ok","response":[{"id":1,"name":"Kojella","start":1397746800000,
"end":1397973600000,"address":"123 Paper St.","city":"Palm Desert","state":"CA",
"country":"US"}]}

$ date -r $((1397746800000 / 1000))
Thu Apr 17 08:00:00 PDT 2014
We can also verify that creating an event works as expected using curl as well. Because, what could be better than a three day festival dedicated to meats on sticks?
curl -w '\n' http://localhost:9000/events/ \
  -H "Content-Type:application/json" \
  -d '{"name":"Austin Satay Limits","start":1443801600000,"end":1444017600000, "address":"456 Skewer Ave","city":"Austin","state":"TX","country":"US"}'

{"result":"ok","response":{"id":2,"name":"Austin Satay Limits","start":1443801600000,"end":1444017600000,"address":"456 Skewer Ave","city":"Austin","state":"TX","country":"US"}}
And finally, ensure that the new event is retrievable by ID.
curl -w '\n' localhost:9000/events/2/

{"result":"ok","response":{"id":2,"name":"Austin Satay Limits","start":1443801600000,"end":1444017600000,"address":"456 Skewer Ave","city":"Austin","state":"TX","country":"US"}}
Shower, rinse, repeat
Now that we have our Event type reading and writing to the database, we will
repeat the process for the TicketBlock type. The only real difference between
the two objects is that our TicketBlock contains a Foreign Key reference to
our Event class.
// ... <snip> ...

import play.api.db.slick.DatabaseConfigProvider
import slick.driver.JdbcProfile
import play.api.Play.current
import play.api.db.DBApi
import SlickMapping.jodaDateTimeMapping
import scala.concurrent.Future
import play.api.libs.concurrent.Execution.Implicits._

// ... <snip> ...

object TicketBlock {
  implicit val format: Format[TicketBlock] = Json.format[TicketBlock]

  protected val dbConfig = DatabaseConfigProvider.get[JdbcProfile](current)
  import dbConfig._
  import dbConfig.driver.api._

  class TicketBlocksTable(tag: Tag)
    extends Table[TicketBlock](tag, "TICKET_BLOCKS") {

    def id = column[Long]("ID", O.PrimaryKey, O.AutoInc)
    def eventID = column[Long]("EVENT_ID")
    def name = column[String]("NAME")
    def productCode = column[String]("PRODUCT_CODE")
    def price = column[BigDecimal]("PRICE")
    def initialSize = column[Int]("INITIAL_SIZE")
    def saleStart = column[DateTime]("SALE_START")
    def saleEnd = column[DateTime]("SALE_END")

    def event = foreignKey("TB_EVENT", eventID, Event.table)(_.id)

    def * = (id.?, eventID, name, productCode, price, initialSize,
             saleStart, saleEnd) <>
      ((TicketBlock.apply _).tupled, TicketBlock.unapply)
  }

  val table = TableQuery[TicketBlocksTable]

  def list: Future[Seq[TicketBlock]] = {
    val blockList = table.result
    db.run(blockList)
  }

  def getByID(blockID: Long): Future[Option[TicketBlock]] = {
    val blockByID = table.filter { f =>
      f.id === blockID
    }.result.headOption

    db.run(blockByID)
  }

  def create(newTicketBlock: TicketBlock): Future[TicketBlock] = {
    val insertion = (table returning table.map(_.id)) += newTicketBlock

    db.run(insertion).map { resultID =>
      newTicketBlock.copy(id = Option(resultID))
    }
  }
}
And update the TicketBlocks controller to reference the new data access
methods.
import scala.concurrent.Future
import play.api.libs.concurrent.Execution.Implicits._

// ... <snip> ...

object TicketBlocks extends Controller {
  def list = Action.async { request =>
    val ticketBlocks: Future[Seq[TicketBlock]] = TicketBlock.list

    ticketBlocks.map { tbs =>
      Ok(Json.toJson(SuccessResponse(tbs)))
    }
  }

  def getByID(ticketBlockID: Long) = Action.async { request =>
    val ticketBlockFuture: Future[Option[TicketBlock]] =
      TicketBlock.getByID(ticketBlockID)

    ticketBlockFuture.map { ticketBlock =>
      ticketBlock.fold {
        NotFound(Json.toJson(ErrorResponse(NOT_FOUND, "No ticket block found")))
      } { tb =>
        Ok(Json.toJson(SuccessResponse(tb)))
      }
    }
  }

  def create = Action.async(parse.json) { request =>
    val incomingBody = request.body.validate[TicketBlock]

    incomingBody.fold(error => {
      val errorMessage = s"Invalid JSON: ${error}"
      val response = ErrorResponse(ErrorResponse.INVALID_JSON, errorMessage)
      Future.successful(BadRequest(Json.toJson(response)))
    }, { ticketBlock =>
      // save ticket block and get a copy back
      val createdBlock: Future[TicketBlock] = TicketBlock.create(ticketBlock)

      createdBlock.map { cb =>
        Created(Json.toJson(SuccessResponse(cb)))
      }
    })
  }
}
We will use our new endpoint to add our first ticket block to the Kojella event, which corresponds to event ID 1.
curl -w '\n' http://localhost:9000/tickets/blocks/ \
  -H "Content-Type:application/json" \
  -d '{"name":"General Admission","eventID":1,"productCode":"GA0001", "price":375.00,"initialSize":1000,"saleStart":1420660800000,"saleEnd":1397746800000}'

{"result":"ok","response":{"id":1,"eventID":1,"name":"General Admission","productCode":"GA0001","price":375.00,"initialSize":1000,"saleStart":1420660800000,"saleEnd":1397746800000}}
Wait, you actually want people to order things?
Looking at all we have accomplished so far, we can be proud of the result. Until
we realize we never created a mechanism for a customer to place an order. This
would not be a very successful ticket store if people could not buy tickets.
Returning to the original data model diagram we can add an Order class to
keep track of customer purchases of tickets from the respective ticket blocks.
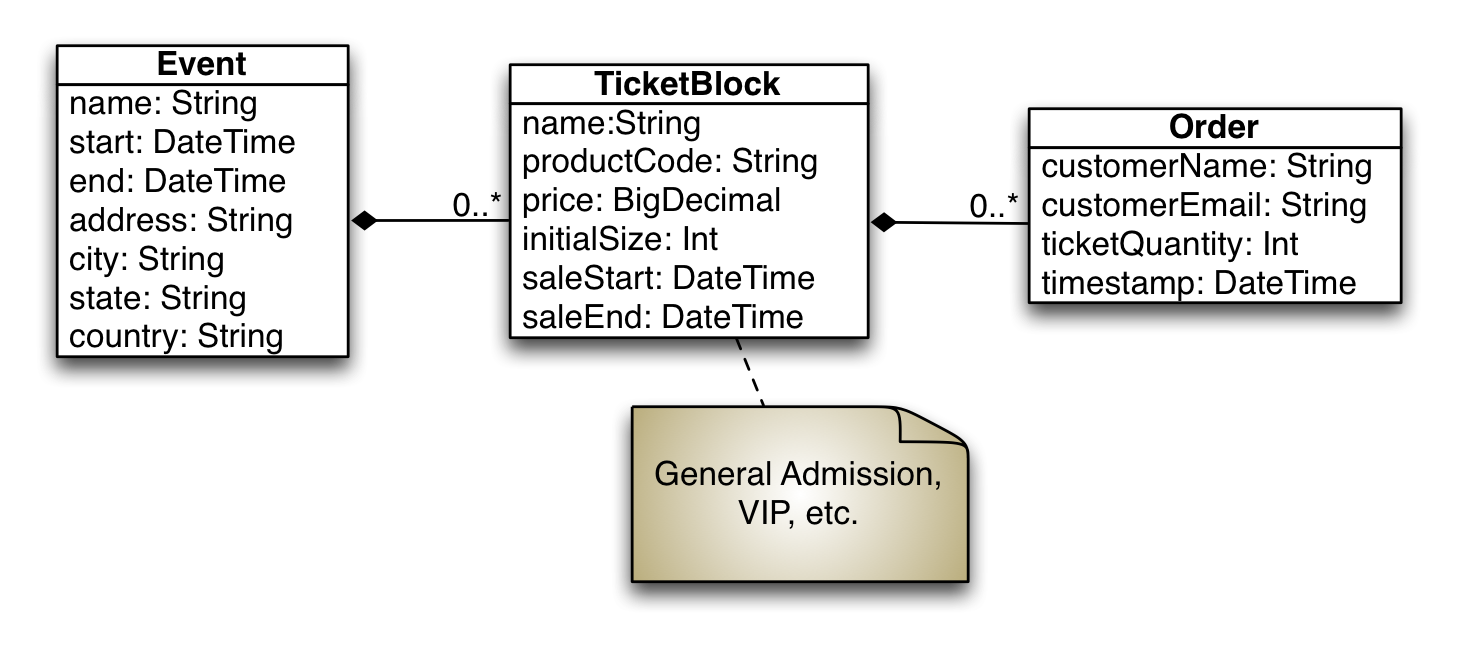
We will create a new case class in the com.semisafe.ticketoverlords package
named Order. We need to make the same changes to the raw data model for the
optional key and a foreign key to TicketBlock. In addition, it does not make
sense for the timestamp to be generated by the client side, so we will make that
an Option to be populated by the server before sending to the database.
package com.semisafe.ticketoverlords

import org.joda.time.DateTime

case class Order(id: Option[Long],
                 ticketBlockID: Long,
                 customerName: String,
                 customerEmail: String,
                 ticketQuantity: Int,
                 timestamp: Option[DateTime])
Migrating the schema
Now that we have defined the native class that defines orders, we can add it to
the database schema. We could easily edit the existing sql file, but this is a
good time to make our first schema migration. Create a new file in
conf/evolutions/default named 2.sql. The contents of an evolutions SQL
migration is the same format as the initial one, just add the SQL required
to change the state of the current schema to match the desired target.
# --- !Ups

CREATE TABLE orders (
    id INTEGER AUTO_INCREMENT PRIMARY KEY,
    ticket_block_id INTEGER,
    customer_name VARCHAR,
    customer_email VARCHAR,
    ticket_quantity INTEGER,
    timestamp DATETIME,
    FOREIGN KEY (ticket_block_id) REFERENCES ticket_blocks(id)
);

# --- !Downs

DROP TABLE IF EXISTS orders;
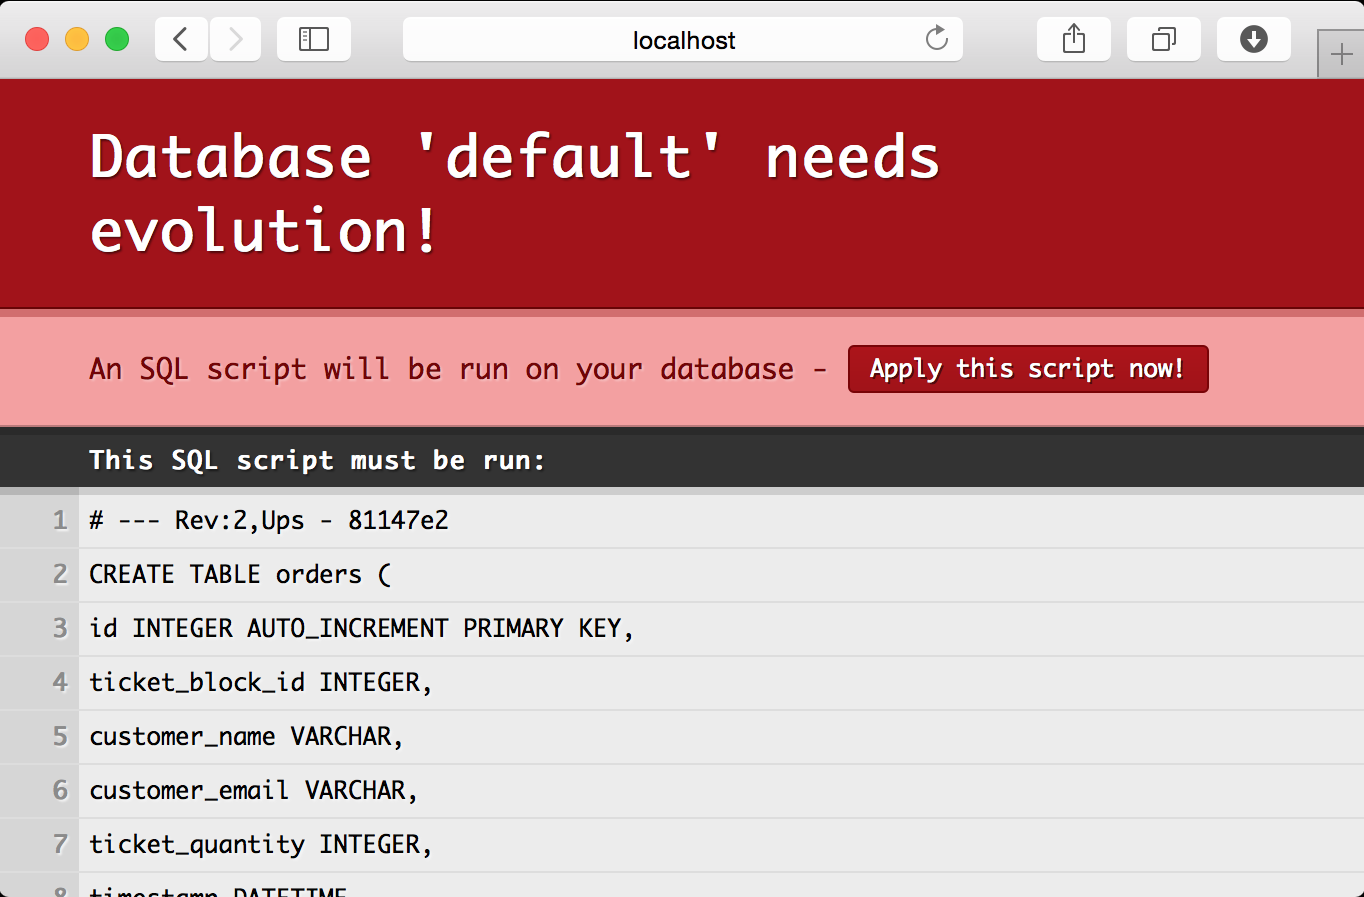
When we load up http://localhost:9000/ we are presented with a new notice that the database needs an evolution. Hit the apply button and the database schema will be updated to support our new Order class, but all of the old data is still there.
Create the same style companion object with one minor difference. Instead of
passing the timestamp value directly, the create function overwrites it with
a new DateTime giving it the current date and time value.
// ... <snip> ...

import play.api.libs.json.{ Json, Format }
import play.api.db.slick.DatabaseConfigProvider
import slick.driver.JdbcProfile
import play.api.Play.current
import play.api.db.DBApi
import SlickMapping.jodaDateTimeMapping
import scala.concurrent.Future
import play.api.libs.concurrent.Execution.Implicits._

// ... <snip> ...

object Order {
  implicit val format: Format[Order] = Json.format[Order]

  protected val dbConfig = DatabaseConfigProvider.get[JdbcProfile](current)
  import dbConfig._
  import dbConfig.driver.api._

  class OrdersTable(tag: Tag) extends Table[Order](tag, "ORDERS") {

    def id = column[Long]("ID", O.PrimaryKey, O.AutoInc)
    def ticketBlockID = column[Long]("TICKET_BLOCK_ID")
    def customerName = column[String]("CUSTOMER_NAME")
    def customerEmail = column[String]("CUSTOMER_EMAIL")
    def ticketQuantity = column[Int]("TICKET_QUANTITY")
    def timestamp = column[DateTime]("TIMESTAMP")

    def ticketBlock = foreignKey("O_TICKETBLOCK",
      ticketBlockID, TicketBlock.table)(_.id)

    def * = (id.?, ticketBlockID, customerName, customerEmail,
             ticketQuantity, timestamp.?) <>
      ((Order.apply _).tupled, Order.unapply)
  }

  val table = TableQuery[OrdersTable]

  def list: Future[Seq[Order]] = {
    db.run(table.result)
  }

  def getByID(orderID: Long): Future[Option[Order]] = {
    db.run {
      table.filter { f =>
        f.id === orderID
      }.result.headOption
    }
  }

  def create(newOrder: Order): Future[Order] = {
    val nowStamp = new DateTime()
    val withTimestamp = newOrder.copy(timestamp = Option(nowStamp))

    val insertion = (table returning table.map(_.id)) += withTimestamp

    db.run(insertion).map { resultID =>
      withTimestamp.copy(id = Option(resultID))
    }
  }
}
And create a controller…
package controllers

import play.api.mvc._
import play.api.libs.json.Json
import scala.concurrent.Future
import play.api.libs.concurrent.Execution.Implicits._

import com.semisafe.ticketoverlords.Order
import controllers.responses._

object Orders extends Controller {
  def list = Action.async { request =>
    val orders = Order.list
    orders.map { o =>
      Ok(Json.toJson(SuccessResponse(o)))
    }
  }

  def getByID(orderID: Long) = Action.async { request =>
    val orderFuture = Order.getByID(orderID)

    orderFuture.map { order =>
      order.fold {
        NotFound(Json.toJson(ErrorResponse(NOT_FOUND, "No order found")))
      } { o =>
        Ok(Json.toJson(SuccessResponse(o)))
      }
    }
  }

  def create = Action.async(parse.json) { request =>
    val incomingBody = request.body.validate[Order]

    incomingBody.fold(error => {
      val errorMessage = s"Invalid JSON: ${error}"
      val response = ErrorResponse(ErrorResponse.INVALID_JSON, errorMessage)
      Future.successful(BadRequest(Json.toJson(response)))
    }, { order =>
      // save order and get a copy back
      val createdOrder = Order.create(order)

      createdOrder.map { co =>
        Created(Json.toJson(SuccessResponse(co)))
      }
    })
  }
}
Finally add the routes…
# Order Resource
POST    /orders/                      controllers.Orders.create
GET     /orders/                      controllers.Orders.list
GET     /orders/:orderID/             controllers.Orders.getByID(orderID: Long)
Now we can place our first ticket order using curl.
$ curl -w '\n' http://localhost:9000/orders/ \
  -H "Content-Type:application/json" \
  -d '{"ticketBlockID":1,"customerName":"Rutiger Simpson","customerEmail":"rutiger@semisafe.com", "ticketQuantity":3}'

{"result":"ok","response":{"id":1,"ticketBlockID":1,"customerName":"Rutiger Simpson","customerEmail":"rutiger@semisafe.com","ticketQuantity":3,"timestamp":1428518832455}}
Querying a single value
We have successfully placed our first order, but there is still a problem with our implementation, tickets are a limited resource. When all of the tickets in a block sell out, they are gone. Our system does not account for this and allows a user to place an order regardless of how many existing orders have already been placed.
We can solve this by adding a method named availability to our TicketBlock
object to see the amount of tickets still available in the block.
def availability(ticketBlockID: Long): Future[Int] = {
  val orders = for {
    o <- Order.table if o.ticketBlockID === ticketBlockID
  } yield o.ticketQuantity

  val quantityLeft = table.filter {
    _.id === ticketBlockID
  }.map {
    tb => tb.initialSize - orders.sum
  }

  val queryResult = db.run(quantityLeft.result.headOption)

  queryResult.map { _.flatten.getOrElse(0) }
}
We also need to update our Orders controller to check for available tickets
before creating the order. Once again, NOT_ENOUGH_TICKETS is just an arbitrary
value (1001) in the ErrorResponse object. Worth pointing out is that we use a
flatMap instead of a map on the availability response. We do this because
we want to result in a Future but some of the code paths also return a future.
This would result in a Future[Future[]] result later that would need to be
flattened anyways. This way, the code is cleaner and all paths just return a
Future as expected.
// ... <snip> ...

import com.semisafe.ticketoverlords.{ Order, TicketBlock }

// ... <snip> ...

def create = Action.async(parse.json) { request =>
  val incomingBody = request.body.validate[Order]

  incomingBody.fold(error => {
    val errorMessage = s"Invalid JSON: ${error}"
    val response = ErrorResponse(ErrorResponse.INVALID_JSON, errorMessage)
    Future.successful(BadRequest(Json.toJson(response)))
  }, { order =>

    val availFuture = TicketBlock.availability(order.ticketBlockID)

    availFuture.flatMap { availability =>
      if (availability >= order.ticketQuantity) {
        // save order and get a copy back
        val createdOrder = Order.create(order)

        createdOrder.map { co =>
          Created(Json.toJson(SuccessResponse(co)))
        }
      } else {
        val responseMessage = "There are not enough tickets remaining to complete this order." +
          s" Quantity Remaining: ${availability}"

        val response = ErrorResponse(
          ErrorResponse.NOT_ENOUGH_TICKETS,
          responseMessage)

        Future.successful(BadRequest(Json.toJson(response)))
      }
    }
  })
}
We can verify it succeeds when it is supposed to.
$ curl -w '\n' http://localhost:9000/orders/ \
  -H "Content-Type:application/json" \
  -d '{"ticketBlockID":1,"customerName":"Walter Bishop","customerEmail":"wbishop@bannedrobotics.com", "ticketQuantity":2}'

{"result":"ok","response":{"id":2,"ticketBlockID":1,"customerName":"Walter Bishop","customerEmail":"wbishop@bannedrobotics.com","ticketQuantity":2,"timestamp":1428551381819}}
We can also verify it will fail when too many tickets are being ordered.
$ curl -w '\n' http://localhost:9000/orders/ \
  -H "Content-Type:application/json" \
  -d '{"ticketBlockID":1,"customerName":"Peter Bishop","customerEmail":"pbishop@bannedrobotics.com", "ticketQuantity":9876}'

{"result":"ko","response":null,"error":{"status":1100,"message":"There are not enough tickets remaining to complete this order. Quantity Remaining: 995"}}
A healthy dose of skepticism
If you have worked with ORMs or any form of auto-generated code before, you
probably have a reasonable and well deserved distrust of anything that builds
code for you, which Slick does with SQL. Slick allows for the display of the
query string to be retrieved directly from the query object. We will use this to
inspect the SQL generated in the recently created availability method.
import play.api.Logger

// ... <snip> ...

Logger.info("Query: " + quantityLeft.result.headOption.statements)
val queryResult = db.run(quantityLeft.result.headOption)

// ... <snip> ...
The next time you make a request you can check the logs and see the following SQL output displayed.
    INFO  application :: Query: List(select x2."INITIAL_SIZE" - x3.x4
    from "TICKET_BLOCKS" x2, (select sum(x5.x6) as x4
    from (select x7."TICKET_QUANTITY" as x6
    from "ORDERS" x7 where x7."TICKET_BLOCK_ID" = 1) x5) x3 where x2."ID" = 1)
Not bad for auto-generated code, but based on a highly scientific method of running code once while on an airplane and refusing to double check my results I feel that it could be faster if we used this query instead:
select INITIAL_SIZE - COALESCE(SUM(TICKET_QUANTITY), 0)
from TICKET_BLOCKS tb
left join ORDERS o on o.TICKET_BLOCK_ID=tb.ID
where tb.ID=${ticketBlockID}
group by INITIAL_SIZE;
Luckily for us, Slick supports the ability to make raw SQL queries as well when needed.
def availability(ticketBlockID: Long) = {
  db.run {
    val query = sql"""
     select INITIAL_SIZE - COALESCE(SUM(TICKET_QUANTITY), 0)
     from TICKET_BLOCKS tb
     left join ORDERS o on o.TICKET_BLOCK_ID=tb.ID
     where tb.ID=${ticketBlockID}
     group by INITIAL_SIZE;
     """.as[Int]

     query.headOption
   }.map { _.getOrElse(0) }
}
And you can curl the over-order one more time to verify it works as intended.
Until next time…
That is all for this epic novel of a post. Looking back, there are a lot of things we were able to accomplish.
- We improved our API for reusability and consistency by creating a common response type
- We learned how to accept URL path parameters as well as POST body data
- Including validating JSON against a known data type
- We built our schema using evolutions
- and migrated it to a second version
- We learned how to use Slick to access the data in both Scala and in SQL
- We learned how to interact with and return
Futures as our results
In the next post, we will cover more asynchronous responses and using Actors to close the giant concurrency bug we just introduced. You noticed the giant concurrency bug, right? ..right?