In the last post, we added another API method to query ticket blocks by respective events while extracting the availability of the tickets in the block. In this post we will take a step back from the back end and give our user interface an overhaul using CoffeeScript-driven React components, replacing our current reliance on server side templates.
As before, the source code for this tutorial series is available on github with the code specifically for this post here. Since the code builds on the previous post, you can grab the current state of the project (where the previous post finished) here.
Why client side rendered UI?
The Twirl template system included in Play is powerful, but it is not the only method to create a front end to our system. We already saw how to make basic UI changes with JavaScript in our first post, we will be expanding on that now.
One reason you may consider building a browser rendered front end is that decoupling the back end API from the user interface completely allows the front and back to grow and change at their own pace. By having a disconnected front end, you can have a totally different team (or totally different company) focused on each aspect of the system.
This is not to suggest that server-side templates should not be used, in fact there are a lot of cases where server-side templates may be preferable. Server-side templates are easier for SEO and accessibility. That said, we will continue using client side UI moving forward.
CoffeeScript
Out of the box, the Play framework supports several client side preprocessors including a CoffeeScript to JavaScript transpiler. Since CoffeeScript compiles to JavaScript, existing JavaScript libraries and utilities will easily interoperate with any code you may write. If you have not used CoffeeScript before, you may get the same initial feeling you had when you first started to learn Scala, there is generally a lot less cruft in the language.
To allow the asset compiler to find the CoffeeScript files, they need to be
placed in the app/assets directory and have the .coffee extension.
There are some discussions on the internet about CoffeeScript popularity waning as ECMAScript version 6 supports several of the features that make CoffeeScript nice to work with. As there is no standard ES6 transpiler for sbt as of yet, although there are some experimental ones, we will continue working with CoffeeScript. I personally find the CoffeeScript code snippets shorter and easier to read.
React
The React framework will be used to generate the client side layout of our application. React was created at Facebook and has been growing in popularity. React allows for composable modules for the display of UI components that are responsible for their own state. It is a bit of a departure from the HTML + jQuery model of client side scripting we did in the first section, but React code tends to be easier to maintain, especially if you were not the original author.
React has a helper language named JSX, which allows for XML like entities embedded inside of your React code. This is to reduce boilerplate code in a JavaScript codebase. There are ways to make this work inside of CoffeeScript, but I have found there is less of a need for JSX, as the CoffeeScript code is terse to begin with.
A last dance with the templates
Before we can dive into client rendered UI, we need to prepare our templates. We will add support for RequireJS to manage our client side dependencies. If you have not used RequireJS before, it is a JavaScript library that allows for modularization of other JavaScript code, making it clear which dependencies exist in each module, while handling the retrieval of the other required scripts. The config driven nature of RequireJS can also be helpful when it comes to testing, as some modules may be mocked easily for tests.
Get Them There Dependencies
We have already identified we are going to need React and RequireJS. We will
add these dependencies now. Open up build.sbt and update your library
dependencies to include React and RequireJS. You can always check for the latest
version of the libraries on webjars.org. Even if the version has changed,
you are probably best off using the listed version for this tutorial, otherwise
you risk the information and code in the post being obsolete and nonfunctional.
Note that we will also update jQuery to the latest current version at this time too. It is worth noting that we have been using the 2.x series of jQuery which does not support IE8 and below, if you are building a site that requires legacy browser support, you may prefer the 1.x branch currently at version 1.11.4.
libraryDependencies ++= Seq(
  specs2 % Test,
  cache,
  ws,
  "org.webjars" % "jquery" % "2.1.4",
  "com.typesafe.play" %% "play-slick-evolutions" % "1.0.0",
  "com.h2database" % "h2" % "1.4.187",
  "com.typesafe.play" %% "play-slick" % "1.0.0",
  "org.webjars" % "requirejs" % "2.1.18",
  "org.webjars" % "react" % "0.13.3"
)
Update the templates
Start by opening up app/views/main.scala.html and remove the links to jQuery
and the stock hello.js script. Underneath the link to our jsRoutes from part
one, we will add a script reference for RequireJS.
@helper.requireJs(core = routes.Assets.at("lib/requirejs/require.js").url,
                  module = routes.Assets.at("some_module").url)
The helper module loads the RequireJS library and initializes it with the
indicated module. You can have a universal module for all configurations in one
place, but it would be nice to be able to identify different modules based on
the template referencing main.scala.html. We can do this by making the name
of the module an argument to the main template.
@(title: String, requireJsModule: String)(content: Html)

@* ... <snip> ... *@

@helper.requireJs(core = routes.Assets.at("lib/requirejs/require.js").url,
                  module = routes.Assets.at(s"js/$requireJsModule").url)
We can now open up app/views/index.html.scala and update the call to main()
to reflect the new requirement. While we are in there, we will delete all of the
logic from part 1. We have a div with an id of “mount”. This is where our
react components will be generated.
@()

@* This view uses a module named "index" for RequireJS *@
@main("Ticket Overlords", "index") {
	<div id="mount"></div>
}
It is convention to have the base file for RequireJS be main.js, but we are
going to ignore convention for now. Create a file under app/assets/js named
index.coffee.
If you are using eclipse, you may find it kicks you into an external editor,
that is perfectly acceptable. Add the following to your index.coffee:
require.config
    shim:
      react:
        exports: 'React'
    paths:
        react: '../lib/react/react'
        jquery: '../lib/jquery/jquery'
If you load the application at http://localhost:9000/, you will see an empty
page. If you inspect the page with your browser’s developer tools you will
notice the empty “mount” div. Under the “sources” section of your browser
development tools, you will also see the page loads assets/js/index.js (Chrome
will load the .coffee file as well). The above CoffeeScript will have transpiled
into something similar to this:
(function() {
  require.config({
    shim: {
      react: {
        exports: 'React'
      }
    },
    paths: {
      react: '../lib/react/react',
      jquery: '../lib/jquery/jquery',
    }
  });

}).call(this);
Having both the CoffeeScript and JavaScript available can be useful if you are learning CoffeeScript. This is helpful to debug how strange errors are interpreted by the CoffeeScript compiler.
This config section is used to tell modules the base path to look for dependencies. This does not actually do anything other than expose the React library and the jQuery library which we had removed from our template. We can now add the base application logic for our index module in the same file.
# Define the requirements for this code block
require [
    'react'
    ], (React) ->

    # Local reference to the React.DOM version of a div
    { div } = React.DOM

    # Define the master view class
    MasterView = React.createClass
        # Define the html / children components
        render: ->
            div { key: 'top' }, [
                div { key: 'mid' }, ["Placeholder"]
            ]

    # Instantiate a MasterView element
    masterView = React.createElement MasterView, null

    # Render the MasterView element inside the "mount" div in the template
    rendered = React.render masterView, document.getElementById('mount')
The first portion of the code utilizes RequireJS to reference that this will
require the React library referenced in the coniguration section. When the
react library is included, it will be referenced via a module named React.
Other than the normal dictionary and array data types, this code snippet
includes the -> operator. This is how functions are denoted in CoffeeScript.
When you refresh the page in your browser, you will see the word “Placeholder”
appear. Inspecting the elements will show the HTML generated by our
MasterView.render method.
<div id="mount">
  <div data-reactid=".0">
    <div data-reactid=".0.$mid">
      <span data-reactid=".0.$mid.0">Placeholder</span>
    </div>
  </div>
</div>
Taking a look at how React works
In our existing code, we have defined our first react component. This component
only has one method: render. The render method in React returns another
React component (in this case a div) which is a composite of another div and
text. All base HTML entities are exportable as a factory from the React.DOM object, we will see much more of this later. A factory for a react component takes two arguments, the props and the children. We can see this in our div components. The first one has a props value named key and it has an array of children containing just one element, the second div. The second div has a key as well, and then text as it’s child.
Every react component has a props data set, which is an immutable, invariant
collection of data for the component. There is also a state data set which
is the mutable data relating to the component. When a member of the component’s
state changes, it will trigger render to be called again. If the result of
render is different than the previous call, the component and it’s children will
be redrawn. For this reason, any values that affect rendering logic should
always be present as state or props values when possible. When a value can be a property, that is always preferable than a state variable as the immutability makes testing far easier.
Once our component has been built, we make a call to the React.render function, passing in the created MasterView component and the DOM element we will be mounting all of our components under: in this case, a div conveniently named “mount”.
Loading Data via AJAX
We will finally begin building the storefront portion of our web application.
When a user comes to visit our site, they will most likely want to see a list
of events they can buy tickets for. We have an API call already that lists
events, and another that supplies the information about ticket blocks, and we do
not want to forget the actual ordering endpoint. Now would be a good time to
expose them via our JavaScript router from Part 1. Open up
app/controllers/Application.scala and change the jsRoutes
action to include the Events.list, Events.ticketBlocksForEvent and
Orders.create routes. If you are building from a previous version, you can removed the reference to Tickets.ticketsAvailable at this point, as it is dead code.
def jsRoutes = Action { implicit request =>
  Ok(
    JavaScriptReverseRouter("jsRoutes")(
      routes.javascript.Events.list,
      routes.javascript.Events.ticketBlocksForEvent,
      routes.javascript.Orders.create
      ))
}
Now that we have exposed this endpoint to our JavaScript router, we can start to
create a React component that retrieves and displays a list of Events. Create a
new CoffeeScript file named app/assets/js/event_list.coffee. Fill out the
skeleton of the component to match the following code.
define [
  'react'
  'jquery'
  ], (React, jQuery) ->

    EventList = React.createClass
        render: ->
            # TODO

    EventList
We define this module as requiring the React dependency, as well as the
jQuery dependency. We have included jQuery here as we intend to utilize the
JavaScriptReverseRouter, which requires jQuery for the AJAX calls. We also
define a new class named EventList and at the bottom of this module we return
the freshly defined EventList type.
Next we will initialize the state dataset. This is done by defining a function
named getInitialState inside of the class definition. This definition
is not exhaustive, you can always add other state elements later, but it is
helpful to define an initial value.
getInitialState: ->
    hasLoaded: false
    events: []
Now that we have defined the initial state of the component, we can add the
asynchronous call to our API. We do this in another lifecycle method called
componentDidMount. This method is called when a React component has been
created for the first time.
componentDidMount: ->
    eventListApi = jsRoutes.controllers.Events.list()
    eventListApi.ajax()
      .done (result) =>
          if @isMounted()
              @setState
                events: result.response
                hasLoaded: true
      .fail (jqXHR, textStatus, errorThrown) =>
          resultCode = jqXHR.status
          if @isMounted()
              @setState
                events: []
                hasLoaded: true
There are a few less obvious things happening in componentDidMount(). The
first is the use of the @ operator, which corresponds to this in JavaScript. Even the call to setState() utilizes this. Note the lack of parentheses in the call to setState. This method expects a dictionary, which is defined on the two lines following the method call.
The second is the use of the => operator. This operator (also referred to as
the fat arrow operator) defines a function just like -> but with one minor
difference. When the fat arrow operator is used, the value for @ is the
value of this where the function is defined, not the value when it is actually
called. This is similar to the bind() function in JavaScript, or the remapping
of sender() to origin we did in the actor post. The reason for this is
similar to why we remapped sender(). When the callback occurs, this is will
not be a reference to the React component we want to operate on.
Finally, the logic in the callbacks are wrapped in a conditional @isMounted().
This check ensures that the react component still exists and should be rendered
by the time the AJAX call returns.
Now we can define a very basic rendering that just displays the content of the
events state variable.
render: ->
    { div } = React.DOM
    if @state.hasLoaded
        div {}, JSON.stringify @state.events
    else
        div {}
The render function simply returns a div containing string representation of
the event array if the hasLoaded value is true, otherwise it renders an
empty div. It may happen faster than you can see, but it will always render
the empty div first, React just redraws the component as the state changes from
the callback in the componentDidMount function.
We can now add the EventList component to our index.coffee code.
require [
    'react'
    'event_list'
    ], (React, EventList) ->

    # ... <snip> ...

    render: ->
        eventList = React.createFactory EventList
        div { key: 'top' },
            eventList { key: 'events' }, null
Once we have added the requirement at the top, our EventList is now available
to be used inside of our index module. To make the EventList usable in the
render method, we need to create a factory for our EventList. This allows
us to add the component in to the render result the same way we have been
adding div elements so far.
There is still no actionable content being displayed, so we will create another
component with a file named event_list_entry.coffee. Our EventListEntry will
use an event object as a prop and create an HTML div as a row containing the
relevant information.
define [
  'react'
  ], (React) ->
    EventListEntry = React.createClass
        render: ->
            { div, span, button } = React.DOM
            if @props.event
                eid = @props.event.id

                eventDate = new Date(@props.event.start)
                readableDate = eventDate.toDateString()

                orderButton = button { key: 'o' }, "Order"

                div {
                  key: "er-#{ eid }"
                  className: "eventEntry"
                }, [
                    span { key: 'evn' }, @props.event.name
                    span { key: 'evc' }, @props.event.city
                    span { key: 'evd' }, readableDate
                    span { key: 'order' }, orderButton
                ]
            else
                null

    EventListEntry
In the definition for the root div we have used the className key in the
property dictionary for the react component. This translates into the HTML
class used for CSS class selectors.
We can now update the EventList class to utilize the EventListEntry.
define [
  'react'
  'jquery'
  'event_list_entry'
  ], (React, jQuery, EventListEntry) ->

      # ... <snip> ...

      render: ->
          { div } = React.DOM
          if @state.hasLoaded
              eventListEntry = React.createFactory EventListEntry

              entries = @state.events.map (event) ->
                  eventListEntry
                      key: event.id
                      event: event

              div {
                  key: 'el'
                  className: 'eventEntries'
              },  entries
          else
              div {}
When you reload http://localhost:9000, you should see a page similar to this:
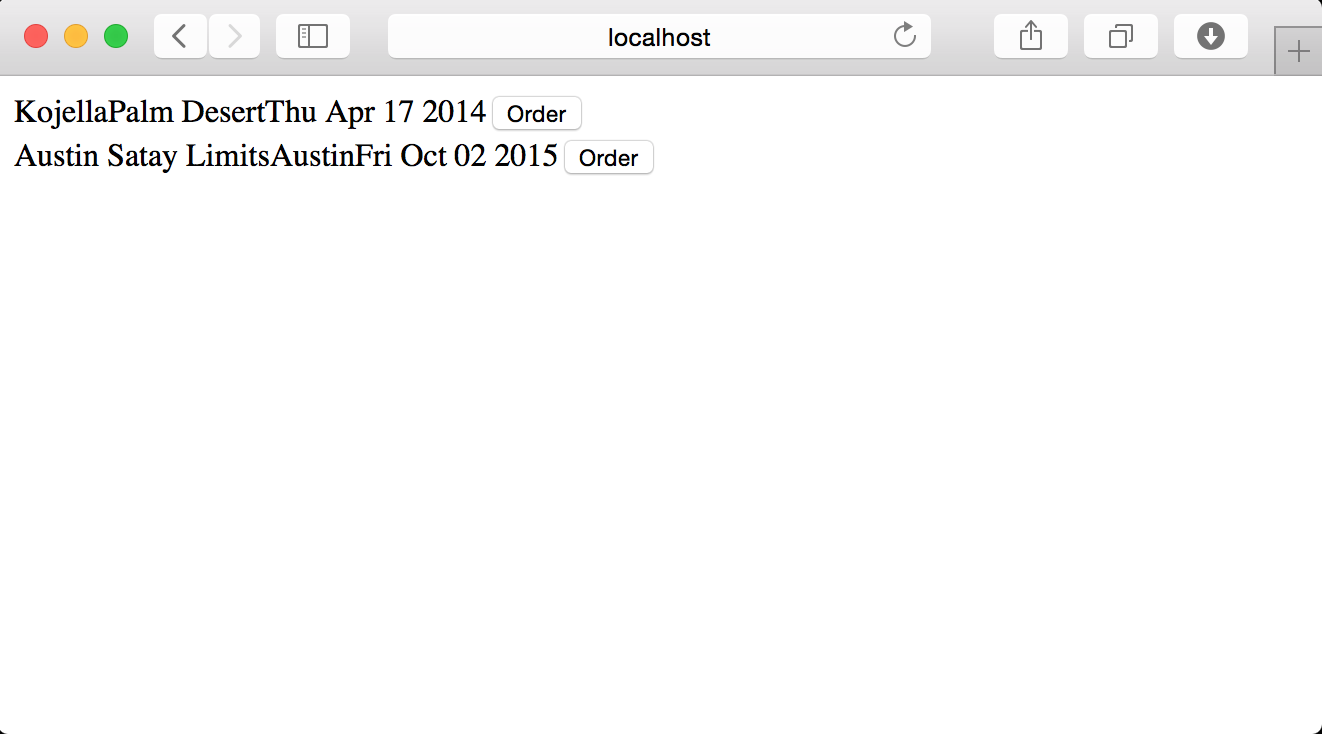
We have not applied much in the way of styling, so the content is is all jammed together. We can ignore that for now to focus on the functionality.
The Order button currently does not do anything. It would be nice if a form for entering the order details appeared when the Order button is clicked.
# ... <snip> ...
EventListEntry = React.createClass
getInitialState: ->
expanded: false
toggleExpanded: ->
@setState
expanded: !@state.expanded
renderEntryBlocks: ->
{ div, span } = React.DOM
div { key: 'blocks', className: 'blocks' },
span { key: 'ph' }, "Placeholder"
render: ->
{ div, span, button } = React.DOM
if @props.event?
eid = @props.event.id
eventDate = new Date(@props.event.start)
readableDate = eventDate.toDateString()
orderText = if @state.expanded then "Cancel" else "Order"
orderButton = button {
key: 'o'
onClick: @toggleExpanded
}, orderText
baseRow = div {
key: "er-#{ eid }"
className: "eventEntry"
}, [
span { key: 'evn' }, @props.event.name
span { key: 'evc' }, @props.event.city
span { key: 'evd' }, readableDate
span { key: 'order' }, orderButton
]
contents = [baseRow]
if @state.expanded
contents.push @renderEntryBlocks()
div {}, contents
else
null
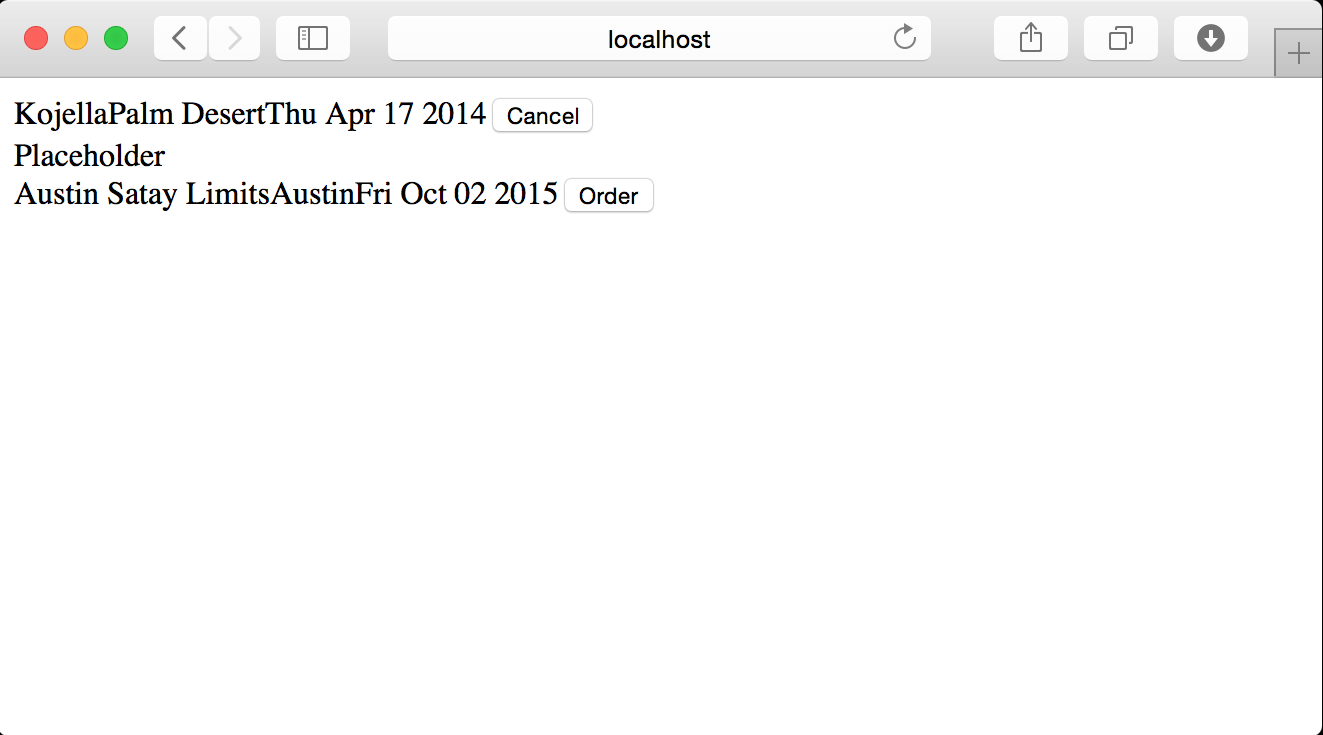
# ... <snip> ...When you reload your browser you should be able to expand the event listings and see the “Placeholder” div appear and disappear.
We can now use our API endpoint from the previous post to load the ticket block information. We will load the ticket block information the first time the “Order” button is clicked instead of when the event entry is rendered. Once the ticket blocks are retrieved, a panel allowing orders to be entered will be displayed.
# ... <snip> ...

gatherTicketBlocks: ->
    ticketBlocksApi = jsRoutes.controllers.Events.ticketBlocksForEvent(
        @props.event.id
    )
    ticketBlocksApi.ajax()
      .done (result) =>
          if @isMounted()
              availBlocks = (tb for tb in \
                  result.response when tb.availability > 0)
              @setState
                  ticketBlocks: availBlocks

      .fail (jqXHR, textStatus, errorThrown) =>
          resultCode = jqXHR.status
          if @isMounted()
              @setState
                  ticketBlocks: null

toggleExpanded: ->
    if @state.ticketBlocks == undefined
        @gatherTicketBlocks()
        @setState
            ticketBlocks: null

    @setState
        expanded: !@state.expanded

placeOrder: ->
    # TODO

renderEntryBlocks: ->
    { div, span, option, label, select, input, button } = React.DOM
    eid = @props.event.id
    if @state.ticketBlocks?
        if @state.ticketBlocks.length > 0
              options = @state.ticketBlocks.map (tb) ->
                  priceFormat = parseFloat(Math.round(tb.price * 100) / 100).toFixed(2)
                  option {
                      key: tb.id
                      value: tb.id
                  }, "#{ tb.name } - $#{ priceFormat }"

              blockChoice = select {
                  key: 'tbo'
                  id: "tbo#{eid}"
              }, options

              div { key: 'opnl' }, [
                  div { key: 'q'}, [
                      label {
                          key: 'lt'
                          htmlFor: "tbo#{eid}"
                      }, "Tickets:"
                      blockChoice

                      label {
                          key: 'lq'
                          htmlFor: "qty#{eid}"
                      }, "Quantity:"
                      input {
                          key: 'qty'
                          id: "qty#{eid}"
                          type: "number"
                          max: 9999
                          min: 1
                          defaultValue: 1
                      }
                  ],

                  div { key: 'n' }, [
                      label {
                          key: 'ln'
                          htmlFor: "name#{eid}"
                      }, "Name:"
                      input {
                          key: 'name'
                          id: "name#{eid}"
                      }

                      label {
                          key: 'le'
                          htmlFor: "email#{eid}"
                      }, "Email:"
                      input {
                          key: 'email'
                          id: "email#{eid}"
                      }
                      button {
                          key: 'o'
                          onClick: @placeOrder
                      }, "Place Order"
                  ]
              ]
          else
              div { key: 'so' }, "No tickets available"
    else
        null

# ... <snip> ...
In this example, we have used more attributes via React such as the htmlFor
attribute on the label that translates to for in HTML or the number, min
and max fields in the quantity input. The quantity input also has a propery defaultValue that is passed in which causes it to display 1 when it is first rendered. In React, if there is a modifiable default there is usually a property named value and another one for the initial value, in this case defaultValue. Never use the value key unless it is a read-only component, otherwise every time it gets re-rendered it will overwrite the user’s input. In addition, note that the ticket blocks that are sold out are discarded in the AJAX response handler.
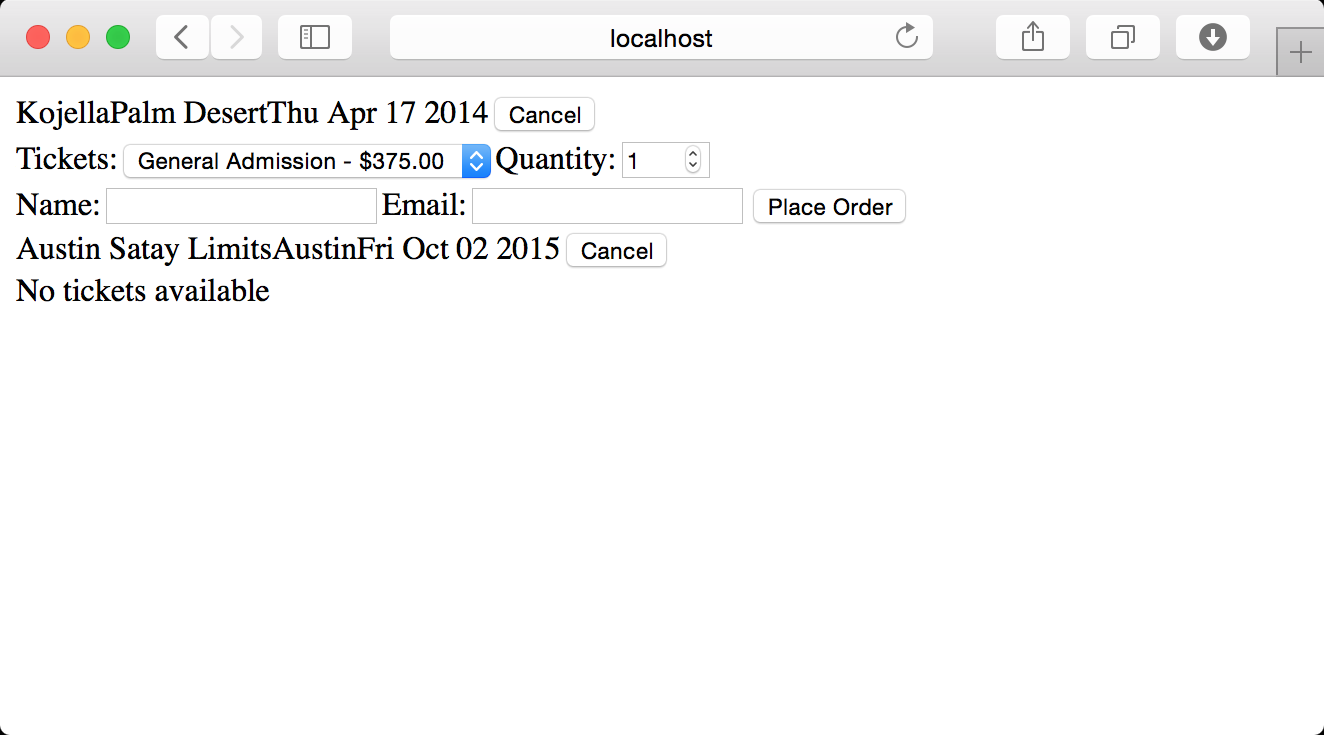
When you refresh the page, it should look similar to this when your events are expanded. (If it says “No tickets available” when there should be some available, try refreshing and expanding again. The existing code still has that bug where the first request to the TicketBlock controller will return zero availability.)
Placing the orders
All that we need to do now is fill out our placeOrder function with the
ability to actually place an order. If you recall from the database access
post, placing an order requires a JSON payload similar to this:
{
  "ticketBlockID":1,
  "customerName":"Peter Bishop",
  "customerEmail":"pbishop@bannedrobotics.com",
  "ticketQuantity":9876
}
We have all of that information available and even have the id fields defined
for the HTML elements. We could use the standard DOM method of
Document.getElementById() to retrieve these values, but in React that is the
wrong way to extract this kind of information. The correct way is to define a
ref attribute when the component is rendered. This is more performant, and
negates the possibility of problems arising from id name collisions.
# ... <snip> ...
option {
    key: tb.id
    ref: "selectedTicketBlock"
    value: tb.id
}, "#{ tb.name } - $#{ priceFormat }"

# ... <snip> ...

input {
    key: 'qty'
    ref: "ticketQuantity"
    id: "qty#{eid}"
    type: "number"
    max: 9999
    min: 1
    defaultValue: 1
}

# ... <snip> ...

input {
    key: 'name'
    ref: "customerName"
    id: "name#{eid}"
}

# ... <snip> ...

input {
    key: 'email'
    ref: "customerEmail"
    id: "email#{eid}"
}

# ... <snip> ...
Now that the refs are defined, they can be accessed easily from other
functions in the React component. This reference contains a method getDOMNode
which (naturally) provides access to the DOM node, allowing inspection of the
values.
placeOrder: ->
    ticketBlockID = @refs.selectedTicketBlock.getDOMNode().value
    ticketQuantity = @refs.ticketQuantity.getDOMNode().value
    customerName = @refs.customerName.getDOMNode().value
    customerEmail = @refs.customerEmail.getDOMNode().value

    # This is pretty lame validation, but better than nothing
    if customerName.length == 0
        alert "Your name is required"
        return
    if customerEmail.length == 0
        alert "Your email is required"
        return

    order =
        ticketBlockID: Number(ticketBlockID)
        customerName: customerName
        customerEmail: customerEmail
        ticketQuantity: Number(ticketQuantity)

    ticketBlocksApi = jsRoutes.controllers.Orders.create()
    ticketBlocksApi.ajax(
        data: JSON.stringify order
        contentType: 'application/json'
    )
    .done (result) =>
        if @isMounted()
            alert "Order placed. REF #{result.response.id}"
            @setState
                expanded: false

    .fail (jqXHR, textStatus, errorThrown) =>
        resultCode = jqXHR.status
        result = jqXHR.responseJSON
        if @isMounted()
            alert "Error placing the order: #{result.error.message}"
A few items worth pointing out in this code relate to the AJAX POST to our event
creation endpoint. The first being that the Content-Type header expected by our
Play application is application/json which is not passed by default. This is
due to the body parser in our controller. That is easy to add in the ajax()
method dictionary. The second thing is the values for our numeric fields must be
cast to Number() before insertion into the POST body. This is because our JSON
validator is strongly typed and will reject the numeric fields if they are
passed as strings.
You can test this out in your browser and verify the order was created by making another request to http://localhost:9000/orders/ which will list all orders in the system.
How about some lipstick?
All that is left is to apply some CSS and we are good to go. Add the following to the existing public/stylesheets/main.css stylesheet that already exists.
@import url(http://fonts.googleapis.com/css?family=Open+Sans:300);
body {
background: #1e5ea8;
font-family: 'Open Sans', sans-serif;
}
div.eventEntries {
display: table;
background: #ffffff;
padding: 10px;
border: 4px solid #1e5ea8;
border-radius: 15px;
}
div.eventEntries > div {
display: table-row-group;
border: 2px solid #838383;
padding: 4px;
}
.eventEntry {
display: table-row;
border: 2px solid #838383;
}
.eventEntry > span {
display: table-cell;
padding: .25em;
}
.orderPanel {
padding: 10px;
border: 4px solid #1e5ea8;
border-radius: 15px;
background-color: white;
color: black;
}
.orderPanel label, .orderPanel input, .orderpanel div {
padding: .25em;
margin: .25em;
}
button {
height: 2em;
border-radius: 15px;
background-color: white;
color: #ffffff;
background-color: #1e5ea8;
}
input {
border-radius: 5px;
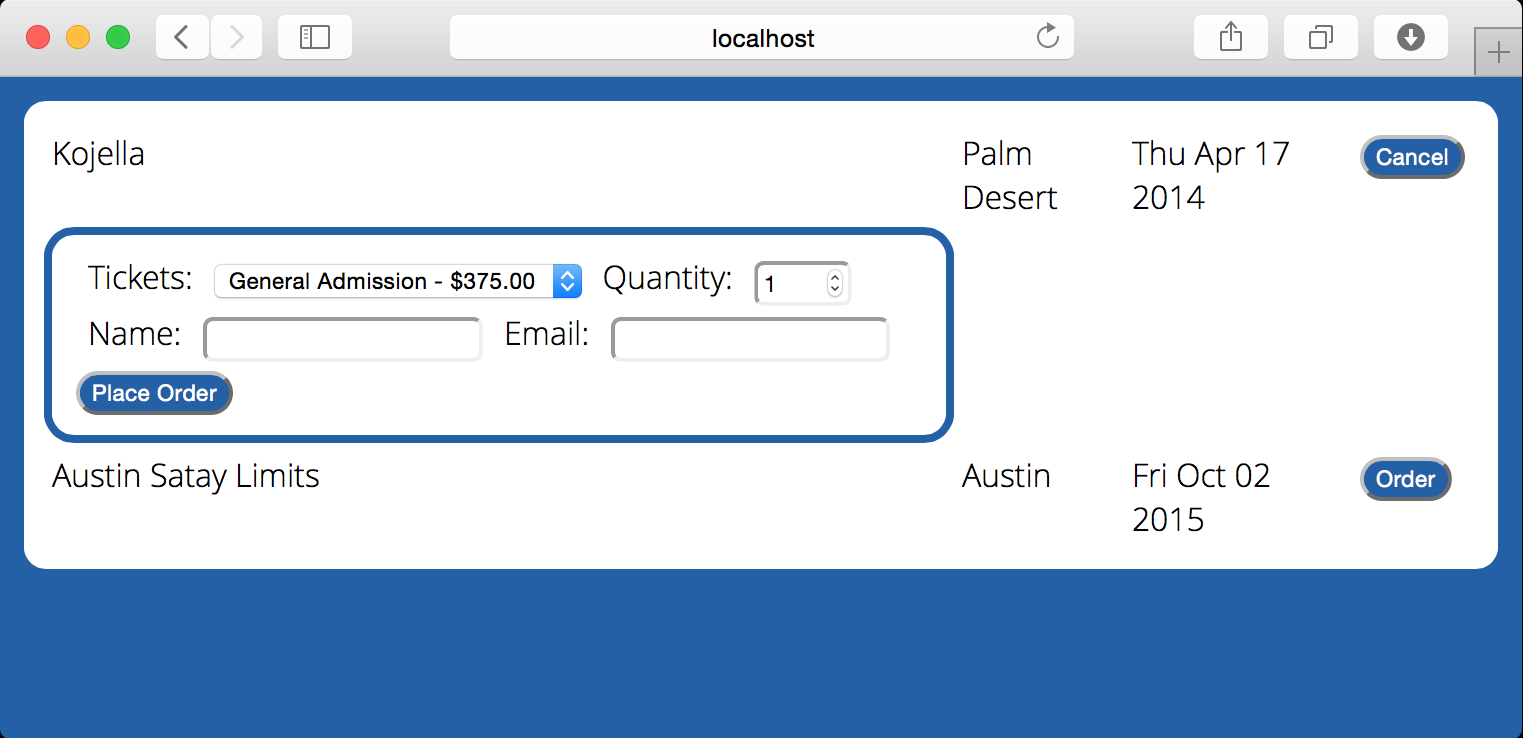
}Now we have a more presentable version of our application. There is plenty of pixel pushing that could be done to improve the look and feel, but that falls into the bucket of things I am not good at and have no business explaining to other people.
Until next time…
In this post we have taken a look at using CoffeeScript and React to create a dynamic and composable client side UI for our application. We have created independent modules using RequireJS and made some improvements to the look and feel of the application.
In the next post we will take a look at cross site request forgery protection in the Play Framework before we dive into authentication.